Microsoft Scout — MCP Servers & Custom Skills
↗ how to extend Microsoft Scout — add MCP servers (local stdio, stdio with env, remote HTTP + OAuth), author your own SKILL.md skills using the markdown-not-code pattern.
On this page
The hub for this series — Microsoft Scout — The Complete Guide — covers what Scout is, how it differs from Copilot, what it costs, and the honest take. This spoke is the extension-and-customisation reference.
Scout ships with seven bundled skills and two bundled MCP servers. Both lists are extensible. This spoke is the “how do I add my own” reference.
MCP — the extension hub
MCP (Model Context Protocol) is the open standard that lets agents like Scout connect to external tools and data sources. If you’re new to MCP, the Work IQ Day 1 post covers the basics — Scout uses the same protocol on the same plumbing.
What ships in the box:
| MCP server | What it provides | Source |
|---|---|---|
@microsoft/workiq | Microsoft 365 context (email, calendar, Teams chats, OneDrive, SharePoint, contacts) via the Work IQ API | Bundled at install |
@playwright/mcp | Browser automation — navigate pages, fill forms, click buttons, interact with web apps | Bundled at install |
What you can add:
- Microsoft-published MCP servers from the catalog — services Microsoft has reviewed and made available for one-click install in Scout
- Community MCP servers from public repositories (most are on GitHub) — installed as a local stdio process or a remote HTTP service
- Your own custom MCP server — anything that speaks the MCP protocol can be added; useful for internal-only data sources, custom workflows, or wrappers around APIs you already operate
Where MCP servers live in Scout’s UI — a visual walkthrough
If you’re orienting in the Scout UI for the first time, MCP discovery, installation, and per-server permissions live in two different places. Here’s the order most users walk:
1. Find the Extensions menu
Click the ellipsis (three dots) icon at the bottom-right of Scout’s main window. A small popover surfaces Heartbeat · Activity · Extensions · Integrations · Settings:
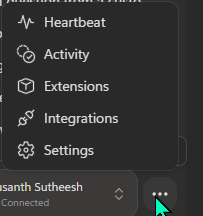
The ellipsis popover. The same menu also surfaces Heartbeat, Activity, Integrations, and Settings — covered in the automations spoke and the secure-config spoke.
2. Open Extensions → MCP Servers tab
Click Extensions. The Extensions panel opens with two tabs at the top — Skills and MCP Servers. Click MCP Servers:
![Microsoft Scout's Extensions panel with the 'MCP Servers' tab selected. The panel shows two sections. 'FEATURED MCP SERVERS' lists Azure DevOps by Microsoft with the description 'Access Azure DevOps, repos, work items, builds, pipelines, and wikis directly from the agent' and a 'Use' button. 'YOUR MCP SERVERS' has a '+ Add Server' button on the right and lists one connected MCP server named 'clawpilot-seismic-bridge' with the marker 'Connected'. The local file path below the server name has been redacted with a solid dark rectangle labelled '[file path redacted for privacy]'. A search icon is in the top right of the panel.](/images/blog/scout-complete-guide/37-scout-extensions-mcp-servers-tab.png)
Extensions → MCP Servers. Two sections: FEATURED MCP SERVERS (Microsoft’s curated catalog — Azure DevOps is the prominent featured pick today) and YOUR MCP SERVERS (anything you’ve added locally). The lone “Your” server in my install is clawpilot-seismic-bridge — yet another live breadcrumb of the Clawpilot lineage Scout’s bones still carry.
3. Add a server
Click + Add Server in the YOUR MCP SERVERS section. The Add MCP Server dialog opens:
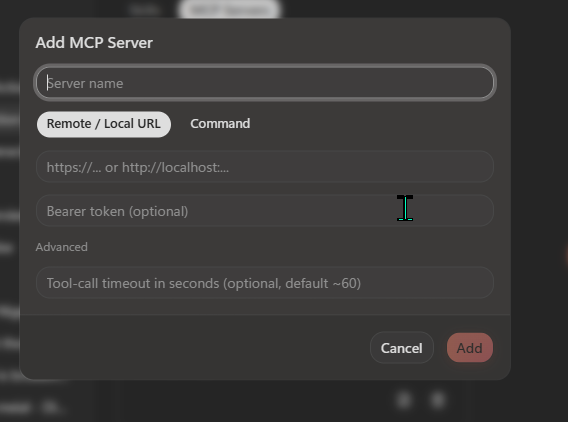
The Add MCP Server dialog. Two modes — Remote / Local URL (HTTP MCPs, with optional bearer token) or Command (local stdio MCPs, typically a Node/Python subprocess command). The Advanced section exposes the tool-call timeout (default about 60 seconds, useful to tune for long-running MCPs).
4. Tighten per-MCP permissions
After adding a server, control which tools auto-approve and which need permission per-call from Settings → Manage Permissions → MCP SERVERS:
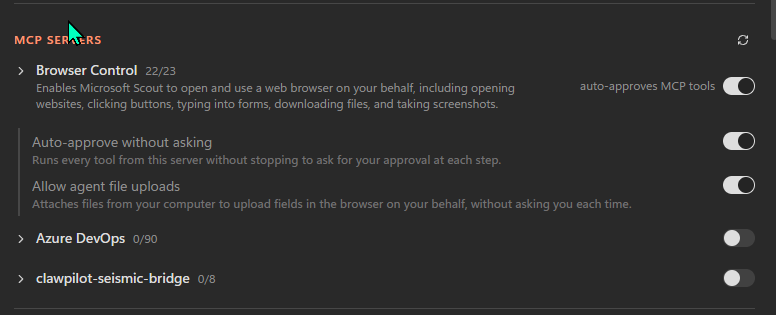
Manage Permissions → MCP SERVERS. Each MCP exposes a tool count (e.g. Browser Control has 22 of 23 tools enabled). Per-MCP, you can flip the master auto-approves MCP tools toggle, then the granular sub-options like Auto-approve without asking and Allow agent file uploads. The two collapsed servers (Azure DevOps with 90 tools, and my clawpilot-seismic-bridge with 8) are both off — they have to be explicitly enabled before Scout will route to them.
Sidebar — “Browser Control” is the friendly name for
@playwright/mcp. Microsoft has given the bundled Playwright MCP a user-facing label that’s clearer than the package name. The same renaming pattern likely applies to other bundled MCPs as Microsoft adds them — worth noticing the gap between the package id in your settings/asar and the friendly name in this UI.
Security tip. Toggling
Auto-approve without askingon for an MCP is the difference between Scout requiring your approval for each tool call vs running every tool that MCP exposes silently. For an MCP whose tools include “write to file” or “send email,” you almost always want this off. The secure-config spoke (row 28) covers the broader auto-approve policy choice.
Three MCP runtime patterns
Scout supports three runtime patterns for MCP servers:
- Local stdio — Scout launches the MCP server as a subprocess on your machine and talks to it over standard input/output. The most common pattern for community-developed servers (the GitHub Copilot CLI’s MCP catalog is full of these).
- Local stdio with environment — same as above, with environment variables (typically secrets) injected at launch time. Used for MCPs that need API keys or tokens.
- Remote HTTP — Scout calls a long-running HTTP endpoint. Used for Microsoft-hosted MCPs and for enterprise MCPs your org operates centrally. OAuth flows are supported for HTTP MCPs that need user-delegated auth.
Each MCP server has its own permission scope. Scout asks for your approval before granting an MCP server new capabilities (for example, the first time an MCP wants to write a file, you get a prompt). Per-server OAuth flows are surfaced through Scout’s gateway-auth UI.
For tightening MCP permissions org-wide, see the secure-config spoke rows 6, 7, 8.
The OAuth consent dialog that appears for HTTP MCPs at first-connect is shown in the secure-config spoke row 8 discussion — capture pending in a future revision of this post.
Custom skills — markdown files, not code
Scout’s skill model is borrowed from the OpenClaw open-source heritage, and it’s deliberately low-ceremony: a skill is a markdown file plus optional supporting assets.
Each skill folder has:
SKILL.md— frontmatter withname+description, then the body content (instructions to the language model on how to perform the skill)- Supporting files — templates, scripts, reference data, examples (whatever the skill needs)
The language model picks the right skill for each request based on the description in the frontmatter. You don’t write routing code; you write a clear description of what the skill does and when it should trigger.
A minimal SKILL.md looks like this:
---
name: weekly-status-draft
description: "Generate a weekly customer status draft. Use when asked for a weekly status report, end-of-week summary, customer activity rollup, or anything that asks for the past week's work across portfolio accounts."
---

# Weekly Status Draft

When the user asks for a weekly status:

1. Pull the last 7 days of activity for the user's portfolio accounts
2. Group activity by account
3. For each account, surface: open opps, recent meetings, recent emails, ACR trend
4. Draft a one-paragraph status per account, in the user's voice
5. Output a single markdown document
That’s it. Drop the file in your skills directory and Scout starts routing to it.
Here’s a second one from my own skills folder — closer to how I actually use Scout day-to-day. It uses Work IQ to pull cross-source context and produces a single Markdown brief I can paste into Teams:
---
name: morning-brief-msx-flavour
description: "Build a single-paragraph morning brief covering overnight email, urgent Teams messages, today's calendar, and any MSX customer activity that changed yesterday. Use when asked for a morning brief, daily standup prep, what-do-I-need-to-know-this-morning, or what-changed-overnight."
---

# Morning Brief (MSX flavour)

When the user asks for a morning brief, run in this order:

1. **Email triage** — last 24h inbox, group by sender, flag senders in the user's top-10-customer list
2. **Teams urgent** — any 1:1 or group chat with an @-mention of the user in the last 12h
3. **Calendar look-ahead** — today's events, flag any with no agenda or prep doc attached
4. **MSX customer activity** — any owned account where ACR moved, an opp changed stage, or a customer logged a support ticket in the last 24h
5. **Compose** — single paragraph, in the user's voice (terse, no preamble), Teams-paste-ready

Always end with one suggested action — the next 30 minutes' most useful task based on what was found.
That’s roughly 20 lines of Markdown for a skill I actually use. When Scout’s heartbeat fires at 09:00 weekdays, that skill is what produces the briefing I open the day with. No CLI, no compile, no version bumps — edit the file, save, the next heartbeat picks it up.
What a real SKILL.md looks like in an editor
Here’s the actual SKILL.md from Scout’s bundled docx skill, open in a text editor:
 · path: C:\\Users\\<user>\\.copilot\\skills\\docx\\SKILL.md")
What’s worth noting:
- Frontmatter at the top — the
nameScout uses to route to this skill, thedescriptionScout reads to decide WHEN to route (this is the routing logic; no code), and an optionallicensefield ---markers open and close the frontmatter — the same YAML frontmatter pattern Hugo and Jekyll use- Body below
---— markdown instructions to the language model on how to perform the skill (redacted here because Microsoft’s bundled skills are proprietary; your own SKILL.md body is free for you to share)
The two SKILL.md examples earlier in this section (the minimal weekly-status-draft and the morning-brief-msx-flavour) show what a YOUR-OWN-skill body looks like — free of any restrictions, edited in your favourite text editor, no toolkit required.
Where skills live
Scout reads custom skills from two local skills directories. On Windows that’s:
%USERPROFILE%\.copilot\skills\— the path shared with Copilot CLI. If you author a skill here, both Scout and Copilot CLI can route to it. This is where most of mine live (carried across from my Clawpilot days).%USERPROFILE%\.copilot\m-skills\— Scout’s own workspace/synced skills path that Microsoft Learn documents alongside the shared CLI path. Useful when you want a skill scoped to Scout only.
If a skill name lives in both paths, the Scout-specific m-skills/ copy wins for Scout’s routing. Most users put their custom skills in ~/.copilot/skills/ for portability across both surfaces.
For team-distributed skills, a few patterns I’ve seen:
- Git-based sharing — keep a team skills repo, each member clones it into their
.copilot/skills/folder, pulls updates regularly - Microsoft Loop / SharePoint — store skill markdown in a shared location, each user pulls into their local folder when they want a new one
- Microsoft-published catalog — Microsoft’s roadmap mentions a future skill catalog for enterprise distribution; not yet GA
What the skills folder actually looks like
Open File Explorer, paste %USERPROFILE%\.copilot\skills into the address bar, and you’ll see your installed skills as plain folders:
")
What’s on mine (visible above): the 7 Microsoft-bundled skills (docx, xlsx, pptx, loop, excalidraw, expense-report, web-artifacts-builder) — see the bundled skills spoke for what each one does — plus several I’ve added myself for my field-engineering work (acr-signal-to-opportunity-coach, forecast-business-review-coach, customer-meeting-prep-outreach-coach, pipeline-msx-hygiene-coach, portfolio-account-planning-coach, funding-partner-activation-coach, solution-value-design-coach and a morning-brief). Each one is a plain folder; nothing in a database, no registration, no manifest signing.
Drill into any one folder and you’ll see the actual on-disk contract Scout reads:

A skill folder is genuinely just:
SKILL.md— required; the frontmatter + body markdown contract Scout readsscripts/— optional; helpers, shell snippets, anything the skill needs to do its job (Python, shell, executables)LICENSE.txt+.bundled-version— only on Microsoft’s bundled skills; not needed on your own
To add a new skill: create a folder under ~/.copilot/skills/, drop a SKILL.md inside, save. Done. Scout discovers it on next session. No build, no install, no service restart.
Important — skills are LOCAL, not OneDrive-synced
A natural assumption (I had it too): “Scout uses OneDrive for memory, so my skills sync across my devices, right?” No.
In Scout’s Settings, the Workspaces section sets the default file location for outputs Scout produces — by default this points to OneDrive - <your org>\Documents\Microsoft Scout\. That’s where Scout drops PNG screenshots, PPTX decks, HTML dashboards, the artefacts it builds for you. Those DO sync across devices via OneDrive.
But the skills themselves — your ~/.copilot/skills/ folder — are always local. They do not sync. If you set up Scout on a second device, you have to re-clone your skills folder manually (git clone if you use a team repo, or simple file copy via OneDrive’s Documents folder used as a transport).
This is by design: skills can contain device-specific scripts, local credentials, or paths to local tools. Auto-syncing them would be a security and compatibility footgun. But the gap between “Scout-outputs-in-OneDrive” and “skills-only-local” surprises a lot of users, so worth knowing up front.
Why markdown-not-code
A few months in, the markdown-not-code pattern has held up well. Benefits I notice:
- No build step — edit a SKILL.md, save, Scout sees the change on the next prompt
- No deploy — no compile, no package, no version management
- Low ceremony — most skills are 10-40 lines of markdown plus a couple of supporting files
- Reviewable by humans — a skill is something you can read, share over Teams chat, or paste into an email; not a binary or a code package
- Portable — the same skill folder works on Scout and Copilot CLI today, and (with minor adjustments) on the open-source OpenClaw runtime too
The trade-off: skills run with whatever permissions Scout has, so a malicious SKILL.md from a random place on the internet could do real damage. Treat skill installs from outside your org the same way you’d treat installing a new browser extension — review the description and the file contents before dropping it into your skills folder.
What to read next in this series
- Microsoft Scout — The Complete Guide (hub) — what Scout is, how it differs from Copilot, what it costs, the honest take
- Admin Install & Frontier Setup — the two-gate admin install walkthrough
- All 7 Bundled Skills Explained — Word, Excel, PowerPoint, Loop, Web Artifacts, Excalidraw, Expense Report
- Secure Configuration Guide — the bookmark-worthy reference for IT admins (read rows 6-10 for MCP-specific tightening)
- Automations, Memory, Heartbeats — Scout’s always-on engine