Microsoft 365 Copilot Cost Management & Billing Guide
← how Copilot's usage-based work is billed and controlled — the billing models, the admin dashboard, and the P1/P2/P3 myth, in plain English
On this page
The short version: Microsoft 365 Copilot now has two kinds of cost — the per-user seat you already know, and usage-based Copilot Credits for the agent work it runs — today Copilot Cowork and the Work IQ API, with more services to come. This page is the admin’s guide to the second one: how you’re billed, how you choose a billing model, where you control it, and how to roll it out without a surprise invoice.
🧭 Jump to: Setup by scenario · Billing models · The P1/P2/P3 myth · P3 & CCCUs · Dashboard walkthrough · Common mistakes · Hitting a limit · Where charges land · Admin roles · Procurement · Rollout · Sources
TL;DR
- Microsoft 365 Copilot has two cost layers: the per-user seat (fixed) and Copilot Credits for usage-based agent work (metered).
- Credits are managed in two admin surfaces: the Microsoft 365 admin center → Cost Management (for Cowork, Work IQ API) and the Power Platform admin center (for Copilot Studio agents). They coexist without double-charging.
- Three ways to pay: pay-as-you-go ($0.01/credit), prepaid capacity packs ($200 / 25,000 credits a month, no rollover), or the annual P3 Pre-Purchase Plan (discounted by volume).
- There is no Copilot P1 or P2. “P3” is just the name of the Pre-Purchase Plan. The P1/P2 you remember were retired Power Apps/Power Automate plans — unrelated.
- The new Cost Management dashboard lets you set spending policies (tenant, group, user), hard caps, alerts, and watch consumption on Overview and Consumption tabs.
- Limits are hard. Hit the cap and metered services pause until the first of the month; users can request more from inside the experience.
- Pilot first: scope a Specific-groups policy, set a cap and alerts, watch the spend, then expand.
⚡ In a hurry? Jump to recommended setup by scenario or the safe rollout pattern.
If you only need the answer — recommended setup by scenario
Skip the theory and start here. Match your situation to a setup, then read on for the why.
| Your situation | Recommended setup |
|---|---|
| Pilot or unknown usage | Pay-as-you-go, scoped to a Specific-groups policy, with a low monthly cap + per-user cap and alerts. Review after 2–4 weeks. |
| Steady, predictable usage | Prepaid capacity packs sized to your floor, not your peak — keep pay-as-you-go on for controlled overage. |
| Large, committed rollout | Model your annual burn, confirm MACC / discount treatment with licensing, then commit to a P3 pre-purchase. |
| Never | A tenant-wide, uncapped pay-as-you-go policy — the one reliable way to get a surprise bill. |
Everything below explains how these pieces work and how to set them up.
Two kinds of money: seats vs credits
The single thing that unlocks every other decision: Copilot now bills in two layers.
flowchart LR
  A[Microsoft 365 Copilot seat
per user - fixed monthly] --> C[Your Copilot bill]
  B[Copilot Credits
per use - metered] --> C
- The seat is a per-user subscription (the Microsoft 365 Copilot licence, list $30/user/month). It’s the entry point — it unlocks the experiences. Predictable, fixed, easy to budget.
- Copilot Credits are a meter — the unit consumed when an agent does work: a Cowork task, a Work IQ API call, a Copilot Studio agent action. Variable, usage-based, and the part that needs controls.
The clean mental model: seat = access · credit = usage meter · spending policy = permission to spend · Azure / Microsoft 365 invoice = where the charge lands. Get those four straight and the rest falls into place.
🧩 What’s a credit, exactly? A Copilot Credit is one unit on the meter; pay-as-you-go it’s $0.01, and different actions cost different amounts. This page is about billing and control — for what a single credit is and the full per-action rate card, see What Are Copilot Credits? Rates & Costs.
🧩 Not everything touches the meter. A lot of internal, licensed, in-Microsoft-365 agent use is zero-rated within fair-use limits — employee-facing agents inside Microsoft 365 Copilot, Teams, or SharePoint. You mainly pay credits for external or customer-facing agents, unlicensed users, and runs not tied to a licensed user’s identity. The full “is this zero-rated?” decision table lives on the credits page — see What Are Copilot Credits? → what’s zero-rated.
The rest of this guide is about the credits layer: where you manage it, how you pay for it, and how you keep it under control.
Where cost management actually lives — the two admin centers
This trips people up, so let’s be clear: there are two places Copilot billing is managed, and which one you use depends on the workload.
The quick abstraction: the Microsoft 365 admin center is where you control who can spend; Azure is where much of the money lands. Power Platform is the older control surface, for Copilot Studio environments.
| Microsoft 365 admin center | Power Platform admin center | |
|---|---|---|
| URL | admin.microsoft.com → Copilot → Cost Management | admin.powerplatform.microsoft.com → Licensing → Copilot Studio |
| Best for | Usage-based services: Copilot Cowork, Work IQ API (and more to come) | Copilot Studio agents and environments |
| What you do there | Activate usage-based billing, set spending policies, budgets, alerts, view Overview + Consumption | Allocate credits to environments, set pay-as-you-go billing policies, per-agent caps |
| Newer or older | The newer, unified experience (2026) | The longer-standing surface for Power Platform |
The Microsoft 365 admin center experience is the new dedicated Cost Management dashboard (Microsoft Learn). It’s where Cowork and the Work IQ API are governed today, and Microsoft has said more agents and services will be added over time.
📎 Both can run at once. If you manage some billing in each surface, Microsoft says its billing system ensures you’re only charged once, wherever you configure the policy (Microsoft Learn). Its advice is to keep it simple and standardise on one surface where you can.
Choosing a billing model: pay-as-you-go, capacity packs, or P3
There are three ways to pay for Copilot Credits. This is a procurement decision — pick based on how predictable your usage is and how much commitment you want.
| Model | What it is | Price (US list, Jun 2026) | Cadence | Rolls over? |
|---|---|---|---|---|
| Pay-as-you-go | Billed for exactly what you use, via an Azure subscription | $0.01 / credit | Monthly, in arrears | n/a — you only pay for use |
| Prepaid capacity pack | A monthly block of credits, bought up front | $200 / 25,000 credits (~$0.008/credit) | Monthly, in advance | No — unused credits are lost at month end |
| P3 Pre-Purchase Plan | An annual prepaid commitment (CCCUs), bought as an Azure reservation | Tiered — bigger commit, bigger discount | Annual | Drawn down over the 1-year term |
Which one should you pick?
flowchart TD
  A[How predictable is your usage?] -->|Pilot or unpredictable| B[Pay-as-you-go
with tight caps]
  A -->|Steady month to month| C[Prepaid capacity packs]
  A -->|Large and committed| D[P3 Pre-Purchase Plan
for the discount]
  B --> E[Always set spending policies + alerts]
  C --> E
  D --> E
- Pilot or unpredictable usage → pay-as-you-go, with tight tenant/group caps so a pilot can’t surprise you.
- Steady, predictable usage → prepaid capacity packs at ~$0.008/credit, but remember they don’t roll over, so size them to your floor, not your peak.
- Large, committed rollout → the P3 Pre-Purchase Plan for the volume discount (details below).
The billing order, if you have more than one
If you’ve got capacity packs and a subscription with P3 credits and pay-as-you-go enabled, Microsoft draws them down in a fixed order to keep spend predictable (Microsoft Learn):
Capacity packs → P3 prepaid credits → pay-as-you-go.
So prepaid money is always spent first, and pay-as-you-go only kicks in as overage once the prepaid is gone.
Example — same spend, different model. Say a pilot burns 80,000 credits a month:
- Pay-as-you-go: 80,000 × $0.01 = $800/month, nothing wasted.
- Capacity packs: 4 × $200 = $800/month for 100,000 credits — but the 20,000 you don’t use vanish at month end.
- The call: start pay-as-you-go with caps while usage bounces around; size packs to the recurring floor once it settles; commit to P3 only when the annual number is predictable. Model your own with the Cowork Cost Calculator.
“Is there a Copilot P1 and P2?” — the myth, busted
This is the question I get most, so let’s settle it.
There is no Copilot Credit P1 or P2. When you buy the annual prepaid plan, the admin center and the Azure reservation surface label it “Copilot Credit Pre-Purchase Plan (P3).” That “P3” is the plan’s name — not the third rung of a P1 → P2 → P3 ladder. There’s no smaller “P1” or “P2” Copilot plan sitting underneath it.
So why do so many admins swear they remember a P1 and a P2?
Because they’re real — just for a completely different product. P1 and P2 were Power Apps and Power Automate “Plan 1” and “Plan 2” licences, withdrawn from sale at the end of 2020 (Microsoft Learn). They have no lineage to Copilot Credits, which didn’t even exist until years later.
| What you might remember | What it actually was | Still around? |
|---|---|---|
| P1 / P2 | Power Apps & Power Automate Plan 1 / Plan 2 licences | No — withdrawn ~end of 2020 |
| P3 | The Copilot Credit Pre-Purchase Plan (annual prepaid credits) | Yes — current |
📎 The line to give a customer: “You won’t find a Copilot P1 or P2 — ‘P3’ is just the name of the prepaid plan. If you’re picturing a P1 and P2, those were old Power Apps and Power Automate plans, gone since 2020. The only numbers you actually choose inside P3 are volume tiers.”
The P3 Pre-Purchase Plan & CCCUs, in detail
If you’ve decided on the annual route, here’s how it actually works (Microsoft Learn — Azure).
- It’s an Azure reservation. You buy the Copilot Credit Pre-Purchase Plan in the Azure portal (Reservations), or directly from Cost Management → Buy prepaid credits in the Microsoft 365 admin center.
- The unit is the CCCU — Copilot Credit Commit Unit. One CCCU pays down $1 of Copilot Credit usage (about 100 credits at $0.01). If usage generates a $100 retail cost, 100 CCCUs are consumed.
- It’s a one-year term, drawn down as you use credits, and set to auto-renew by default.
- Bigger commitments earn bigger discounts, chosen as volume tiers (not P-numbers). Microsoft’s own worked example: buying Tier 2 (15,000 commit units) to cover 1,500,000 credits gives roughly a 6% saving versus pay-as-you-go.
- Overage is automatic. Once prepaid CCCUs run out, eligible usage simply continues on pay-as-you-go — no service interruption.
- Purchases are final. Unlike a standard Azure reservation, Microsoft doesn’t support cancelling or exchanging a Copilot Credit Pre-Purchase Plan — so size the commitment carefully.
⚠️ One discount caveat: Microsoft notes pre-purchase discounts don’t stack with other discounts you might already hold, so your effective saving can be lower than the listed tier. And exact tier pricing varies — model it against your own forecast, don’t assume the headline percentage.
A couple of things the public docs don’t spell out (so don’t promise them): the full tier-by-tier discount schedule, and whether the plan counts toward a broader Azure consumption commitment like MACC. Confirm both with your Microsoft licensing contact. (More on that below.)
Before you commit to P3, confirm with your licensing contact: (1) your expected annual credit burn, (2) the discount tier and effective price, (3) whether existing discounts still apply or are displaced, (4) MACC treatment, (5) who owns the invoice, (6) who owns auto-renewal, (7) overage behaviour once credits run out.
Inside the Cost Management dashboard — a walkthrough
Here’s the new Microsoft 365 admin center → Copilot → Cost Management experience, step by step. (Screens are from Microsoft’s Cost Management demo environment, so the names and figures are sample data.)
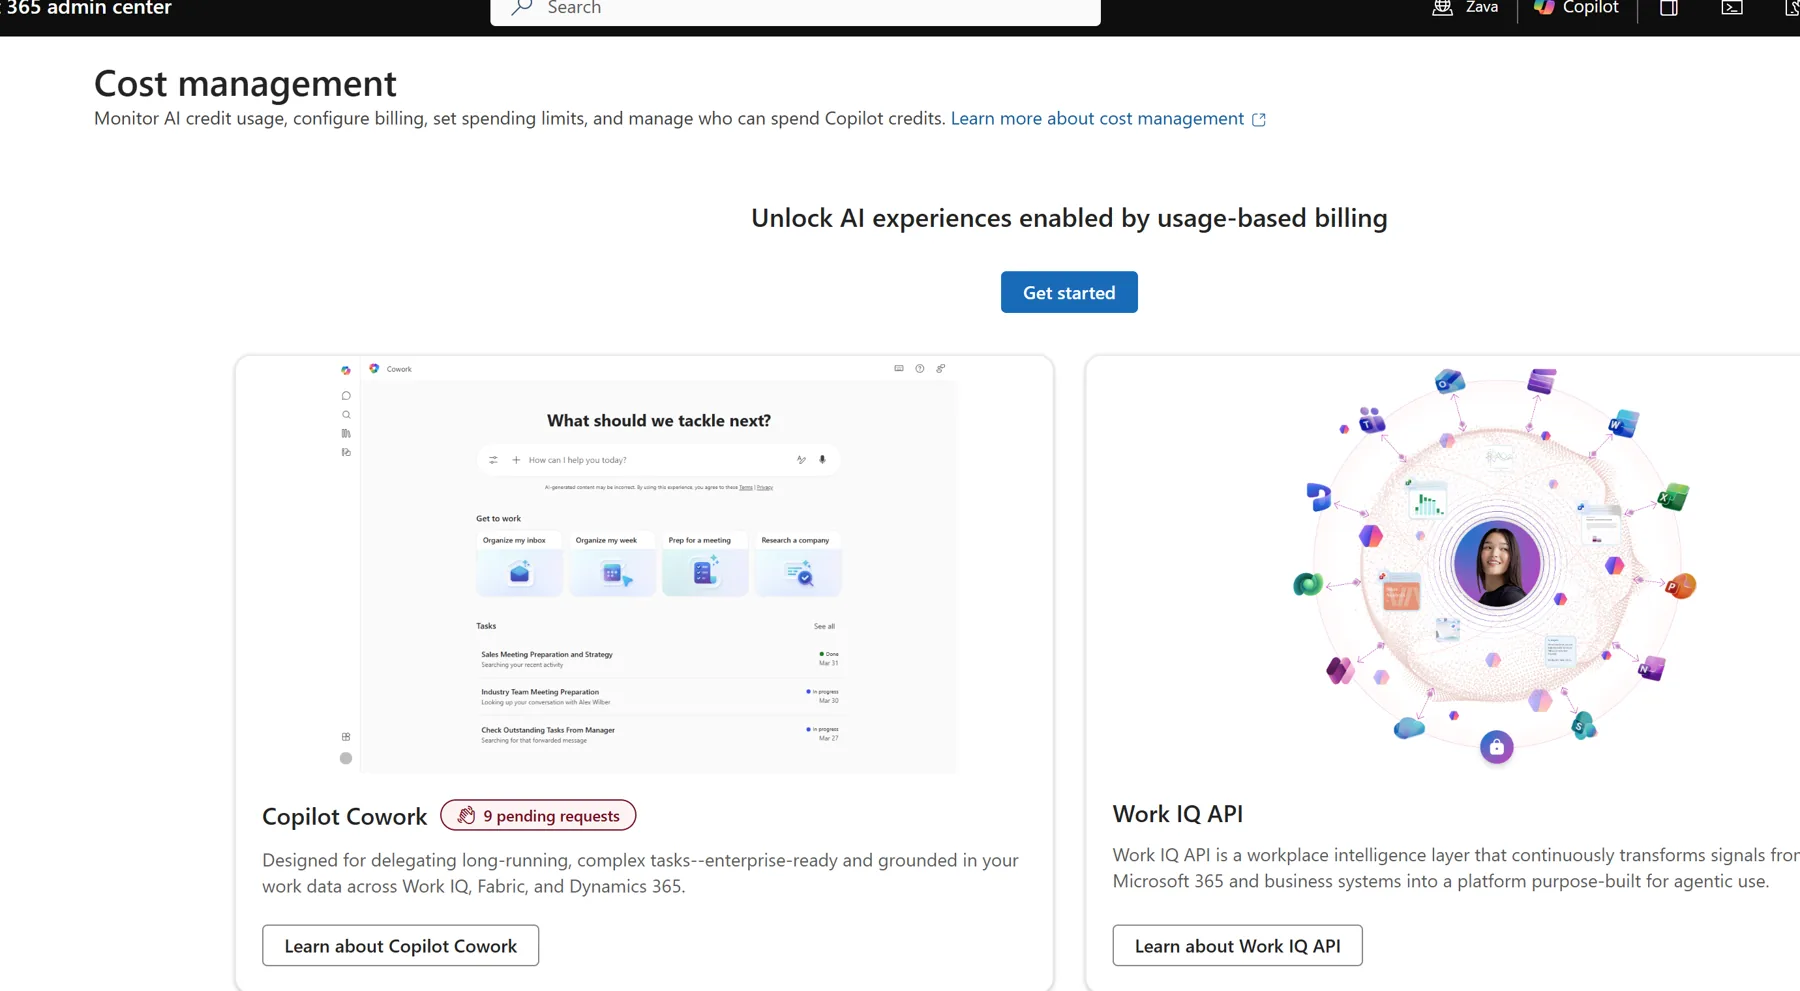
The Cost Management home — Copilot → Cost Management. Get started activates usage-based billing; the cards show the services it covers today (note the “9 pending requests” signal on Cowork).
Step 1 — make it discoverable
In Copilot → Settings, turn on “AI experiences enabled by usage-based billing.” This controls visibility and is off by default. One nuance: setting up usage-based billing for a user overrides this toggle — entitled users see the experience even with discovery off (Microsoft Learn).
Do this: leave discovery off until your billing policies and caps are ready — unless you deliberately want demand to surface as requests.
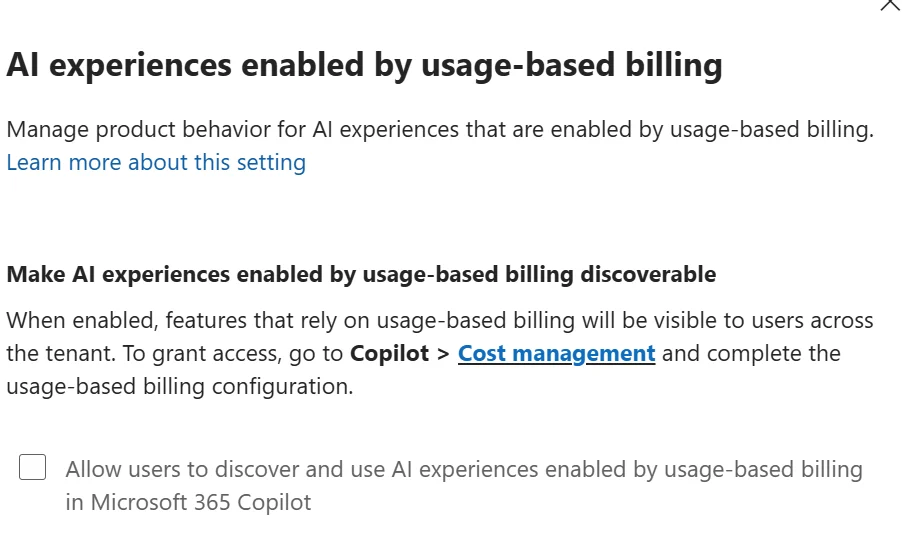
Step 1 — the discovery setting under Copilot → Settings. Turning it on makes usage-based experiences visible across the tenant.
Step 2 — activate a default spending policy
In Cost Management, select Get Started. The default policy is what unlocks the usage-based services. You confirm a billing method, choose whether to cap monthly spend (and optionally a per-user cap so one person can’t drain the budget), and set alert recipients and a threshold (Microsoft emails the people you pick when spend crosses it, then weekly until the month resets). Then Activate.
Avoid: activating an uncapped All-users policy unless finance has explicitly approved open-ended pay-as-you-go.
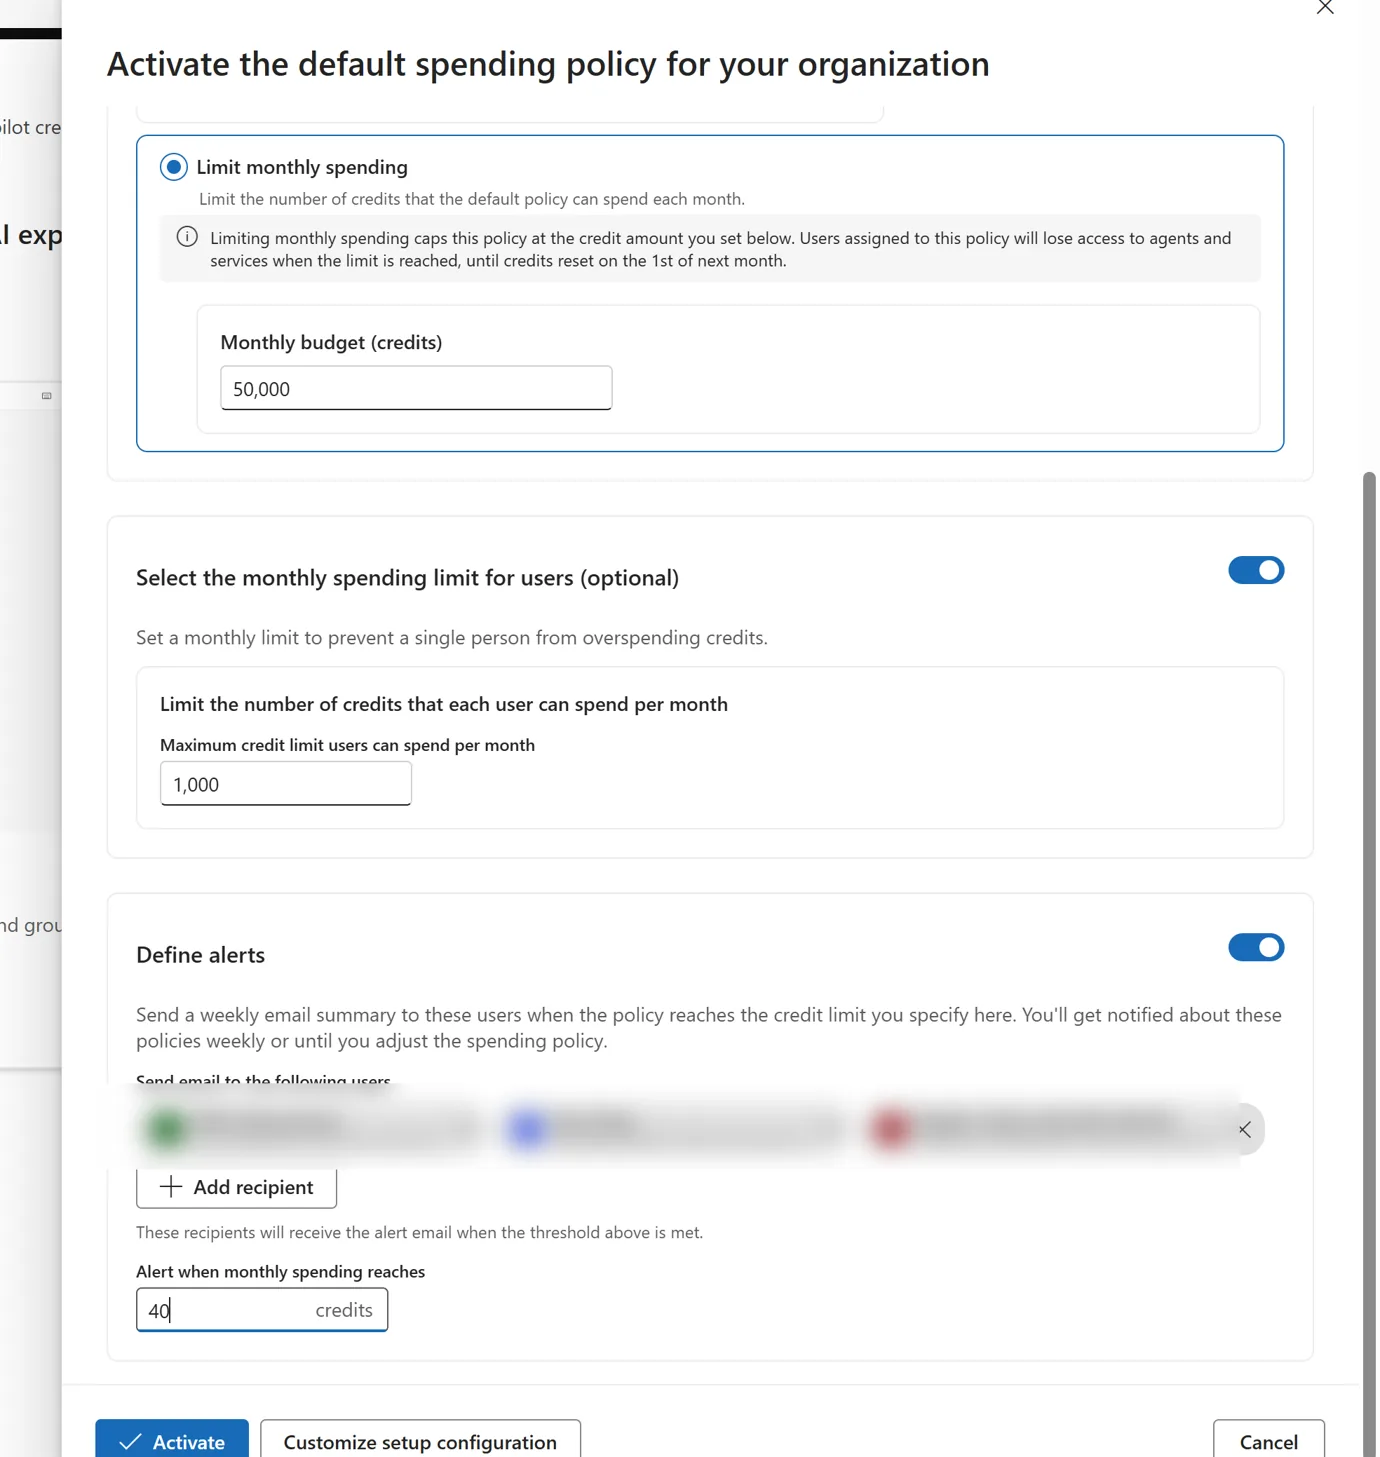
Step 2 — the Activate the default spending policy panel: cap the policy’s monthly spend (here 50,000 credits), add an optional per-user limit (1,000), switch on email alerts, then Activate.
Step 3 — scope tighter with targeted policies
Beyond the default All users policy, add Specific-groups policies (via security groups) to govern who gets which services and how much. A targeted policy takes precedence over the default for the users it covers. You also pick which agents and services the policy can spend on — Cowork, Work IQ API — with a toggle to auto-include new services as they launch.
Do this: make Specific groups your default rollout pattern — it’s how you keep a pilot contained. Leave auto-include new services off for conservative tenants; turn it on only if you want future metered services covered automatically.
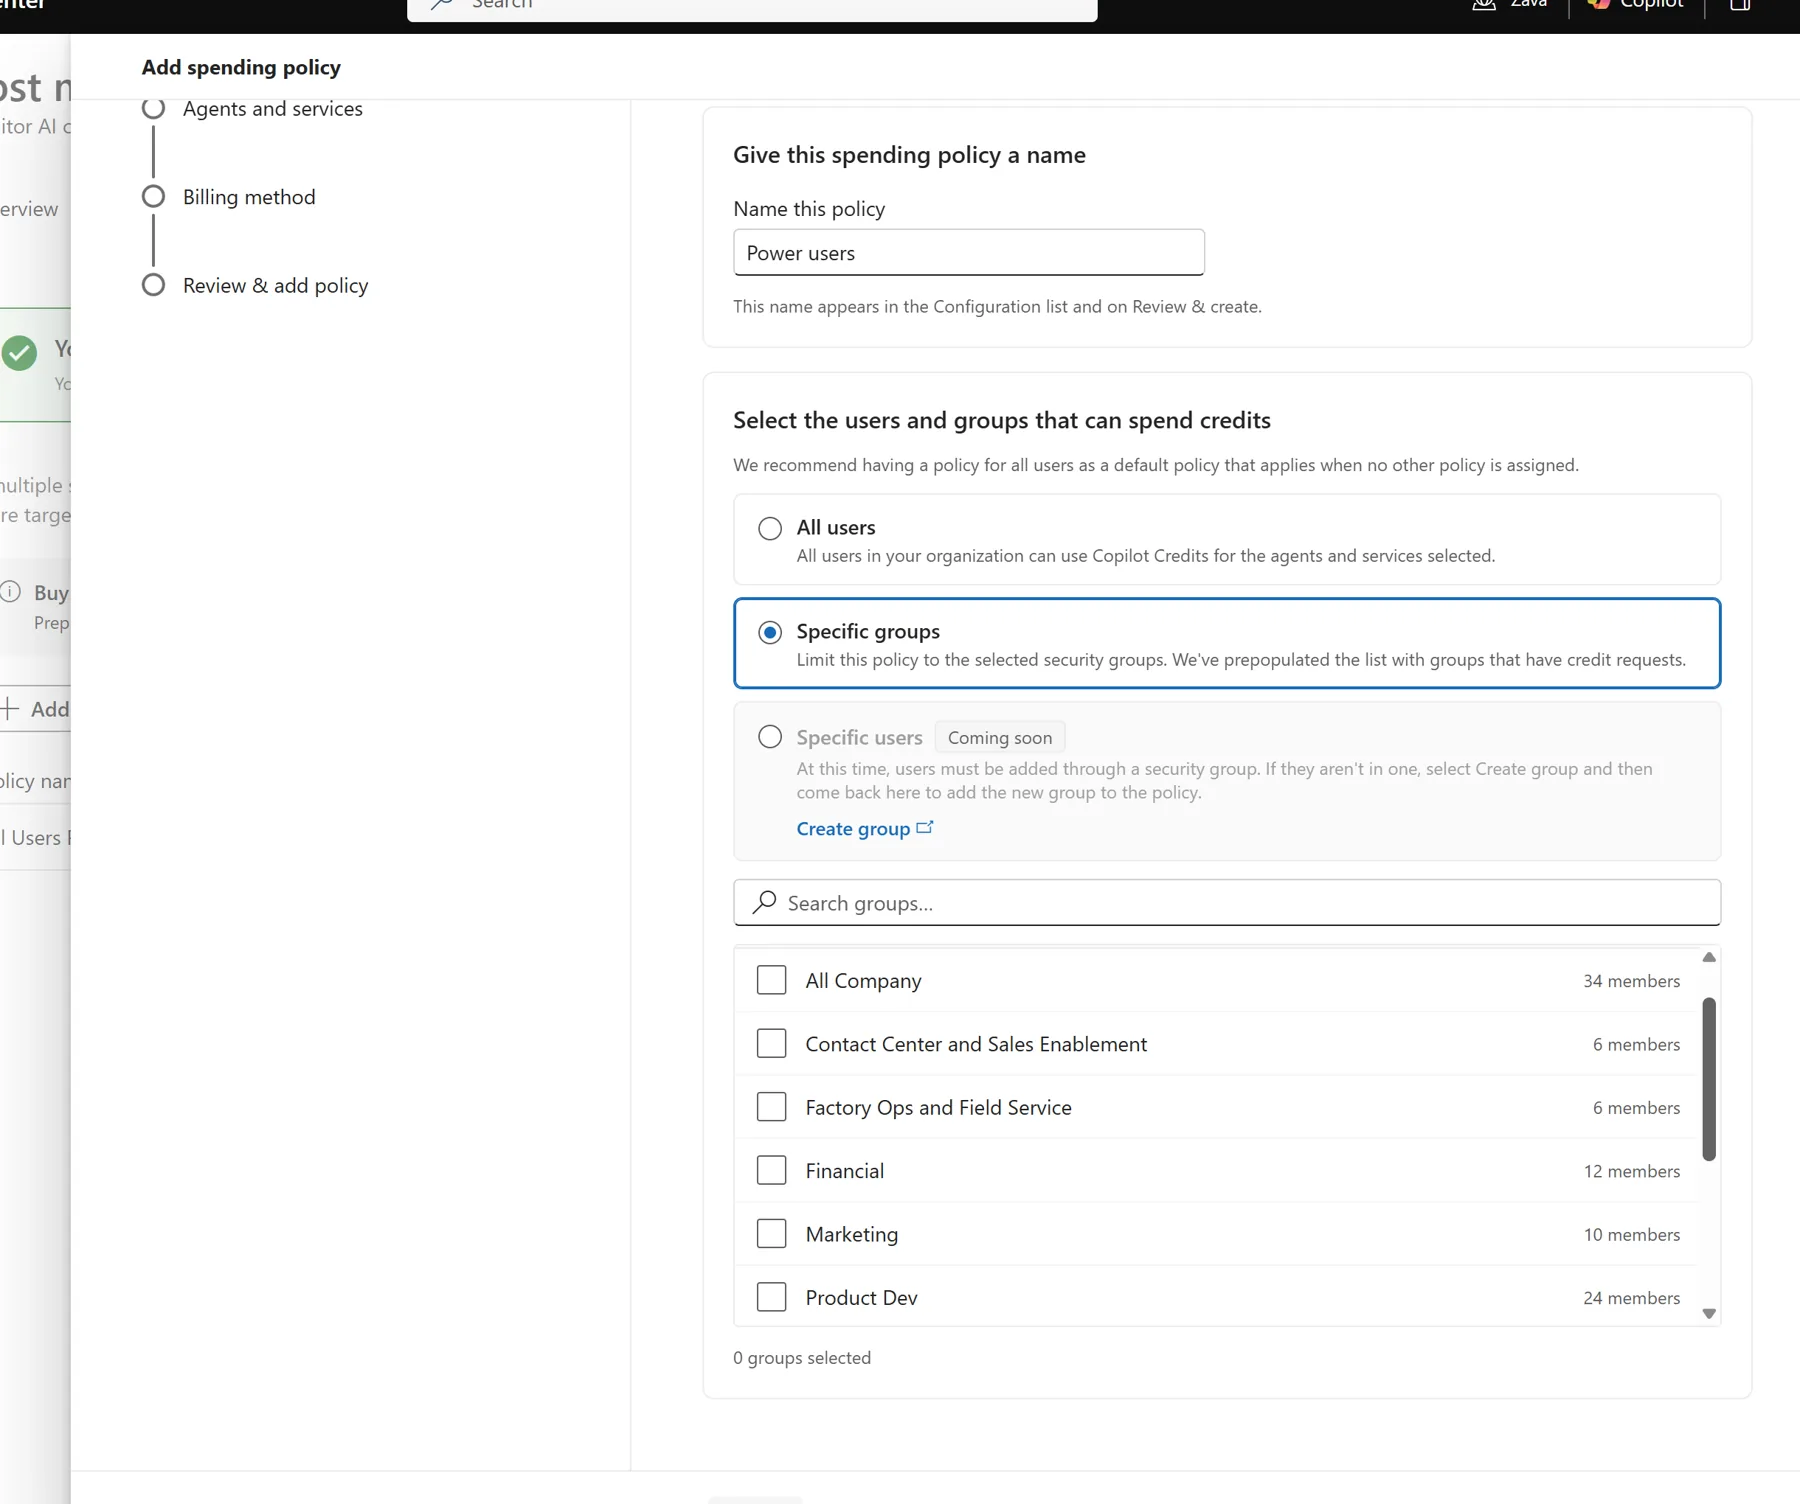
Step 3 — scope a policy to All users or Specific groups (via security groups). The step rail on the left shows the rest of the wizard.
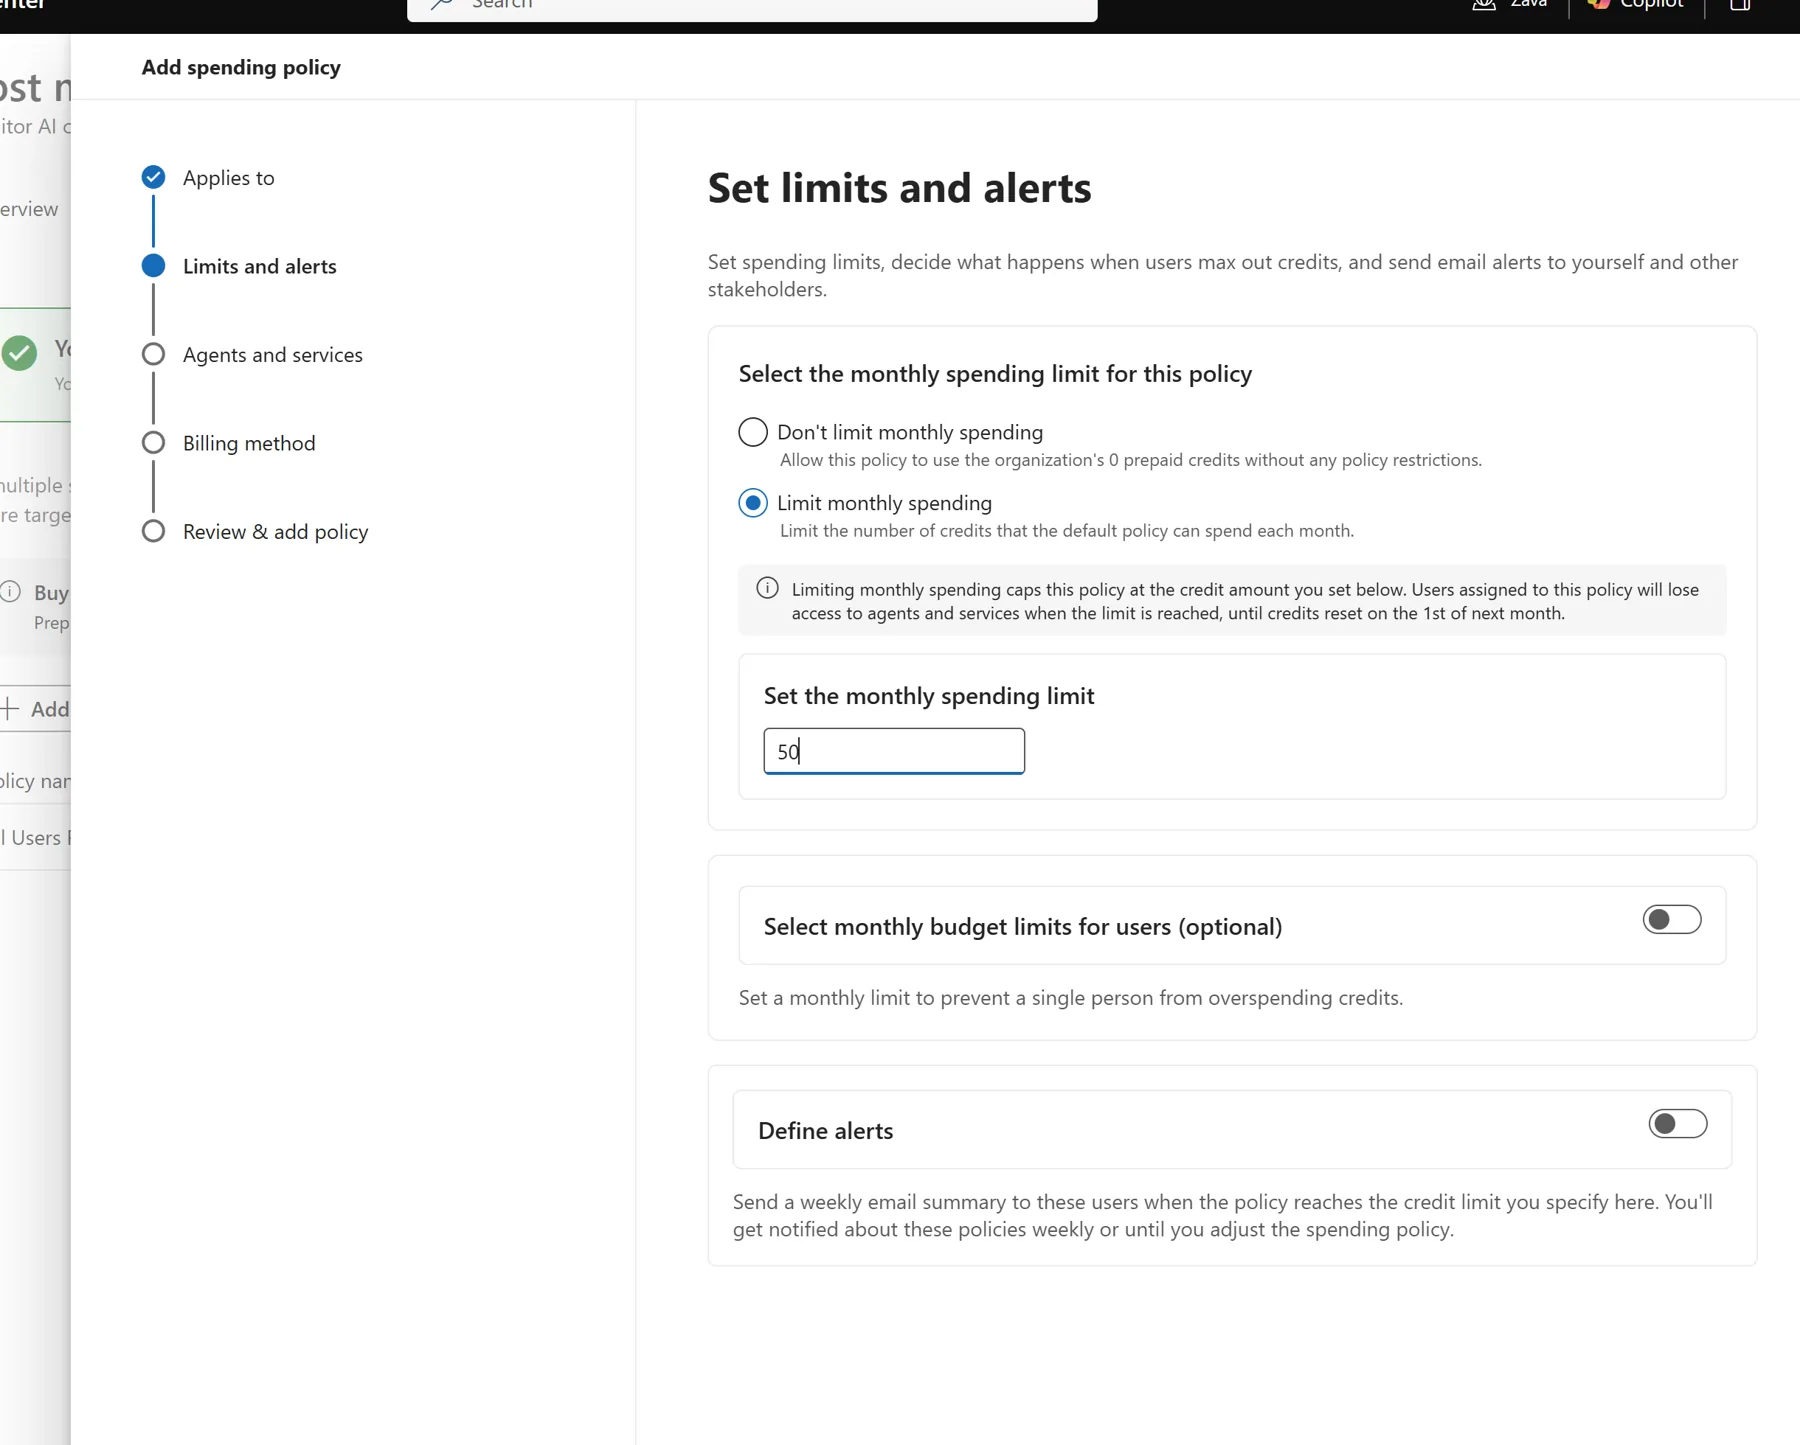
Step 3 (continued) — Set limits and alerts: cap the policy’s monthly spend, optionally add a per-user budget, and switch on email alerts so spend never surprises you.
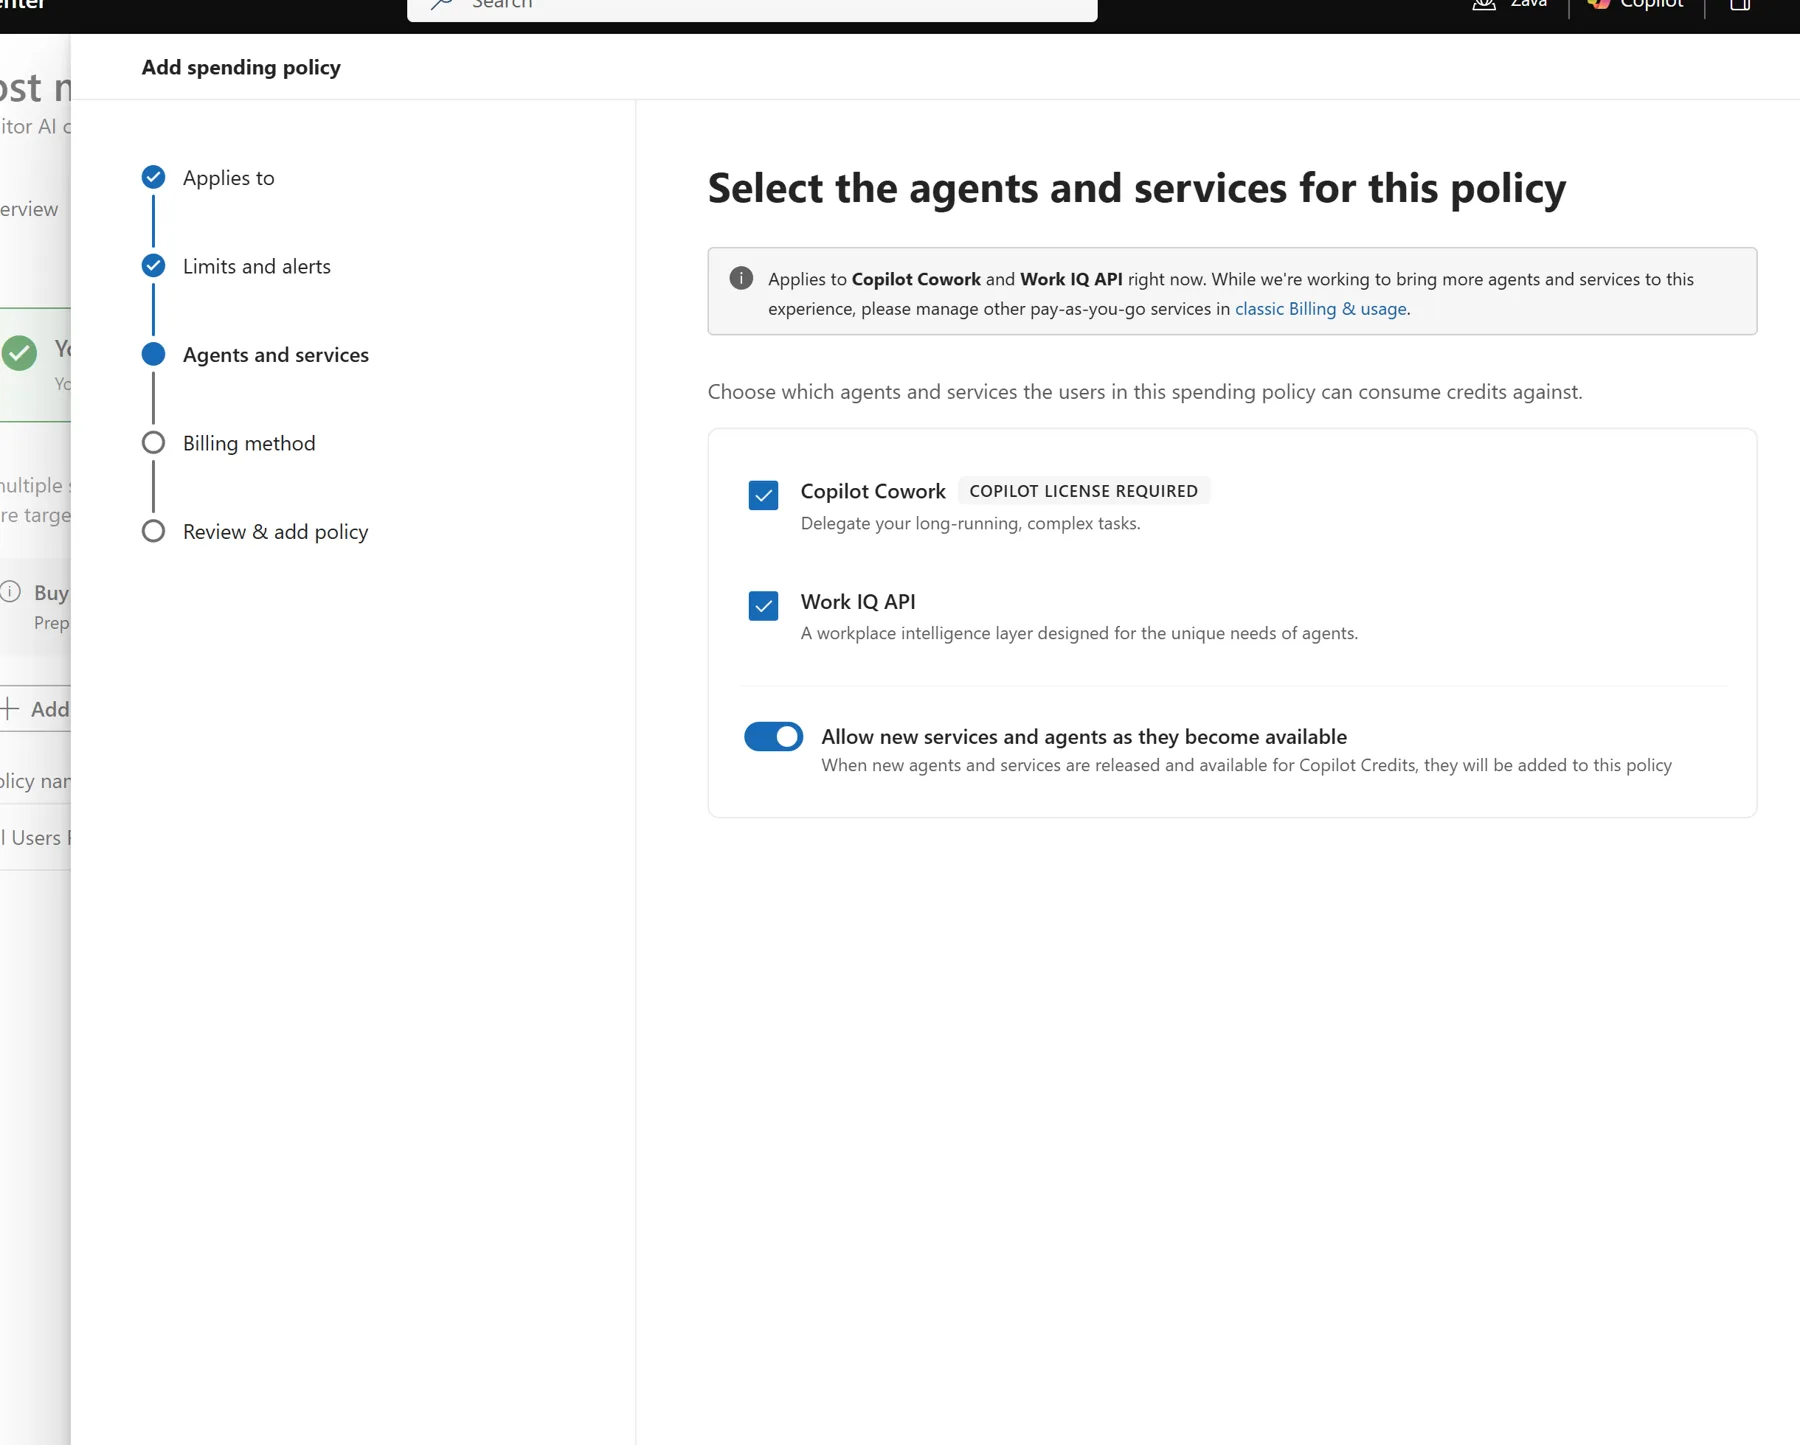
Step 3 (continued) — choose which agents and services the policy can spend on. Today that’s Copilot Cowork and the Work IQ API, with a toggle to auto-include new ones.
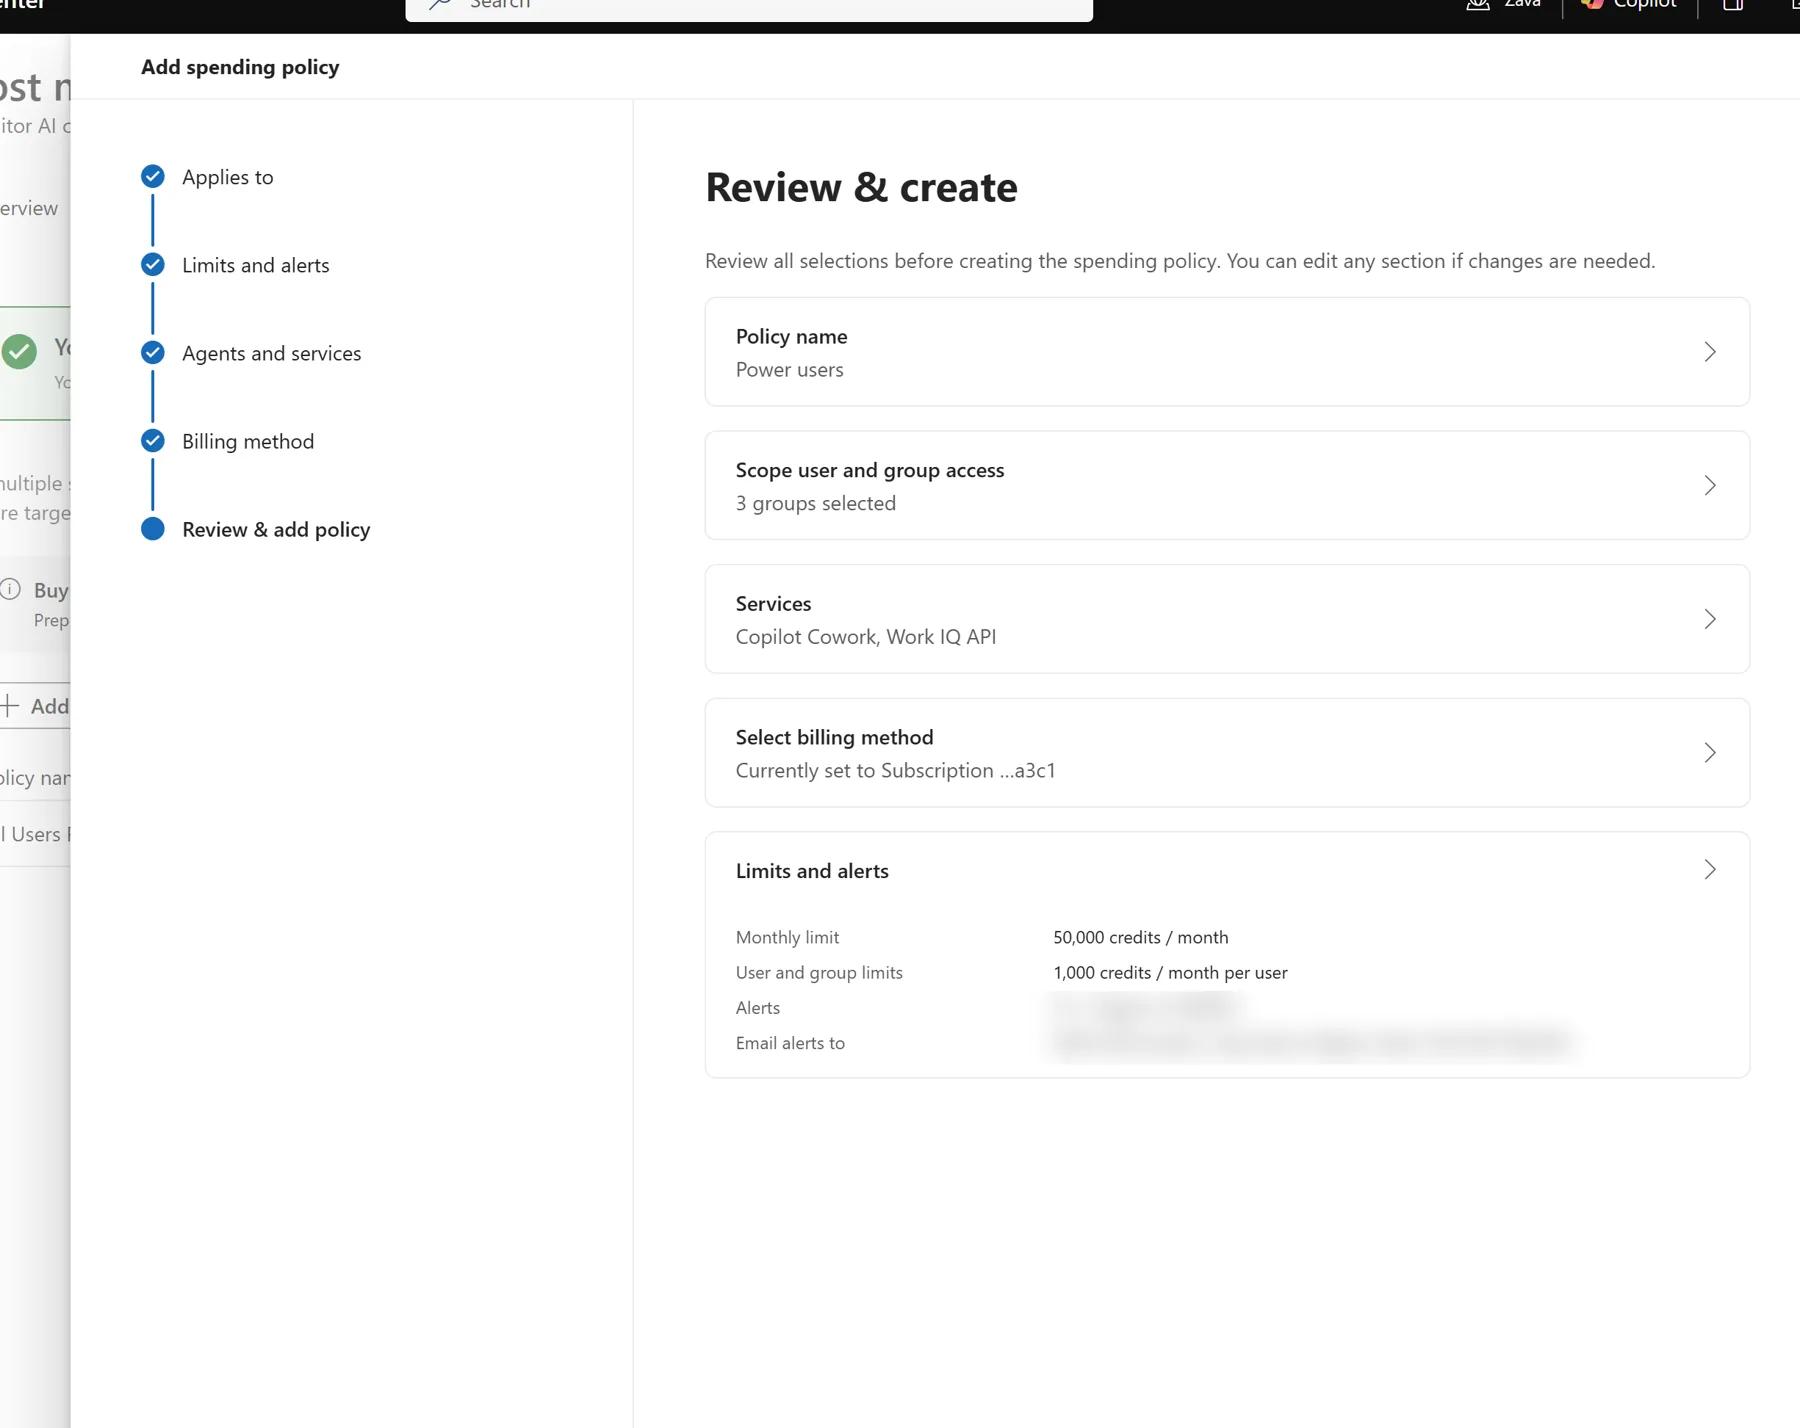
Step 3 (review) — the Review & create screen lays out the whole policy in one place — scope, services, billing method, and limits — before you commit.
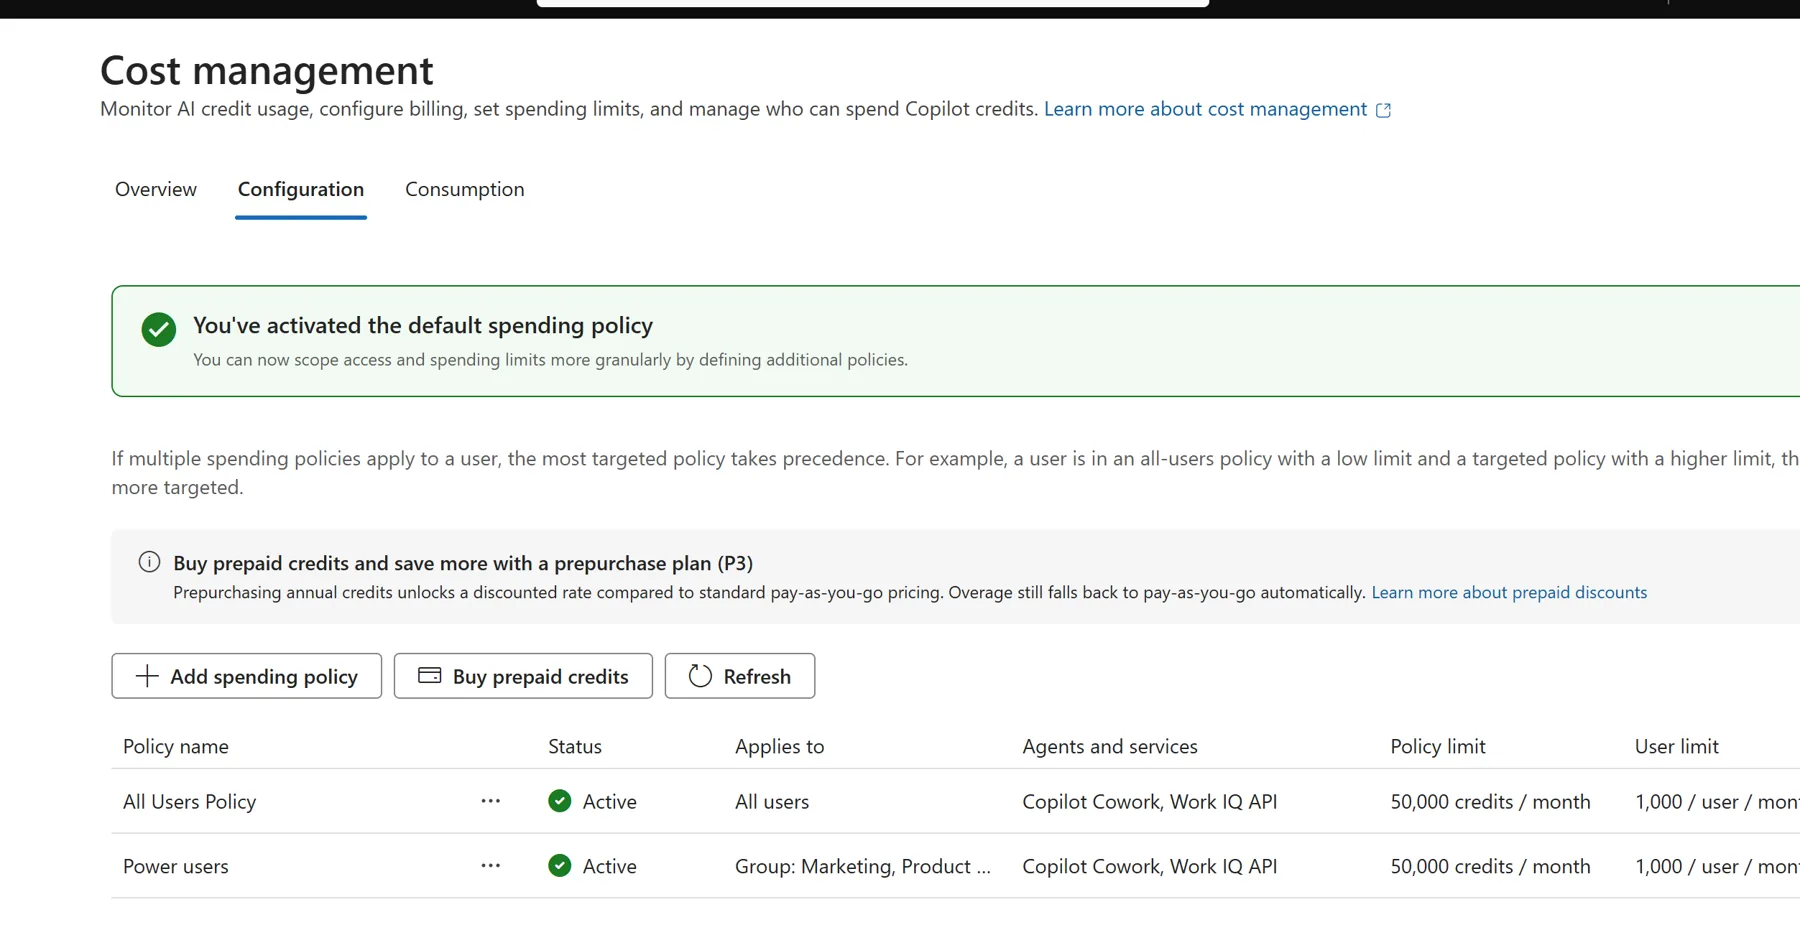
Once created, every policy shows up on the Configuration tab — here the default All Users Policy and the targeted Power users policy, both active. Where they overlap, the most targeted policy wins.
Step 4 — buy prepaid credits (optional)
From Configuration, Buy prepaid credits walks you through the P3 Pre-Purchase Plan — pick the subscription, choose the commit amount, check out. Those credits are then drawn down first.
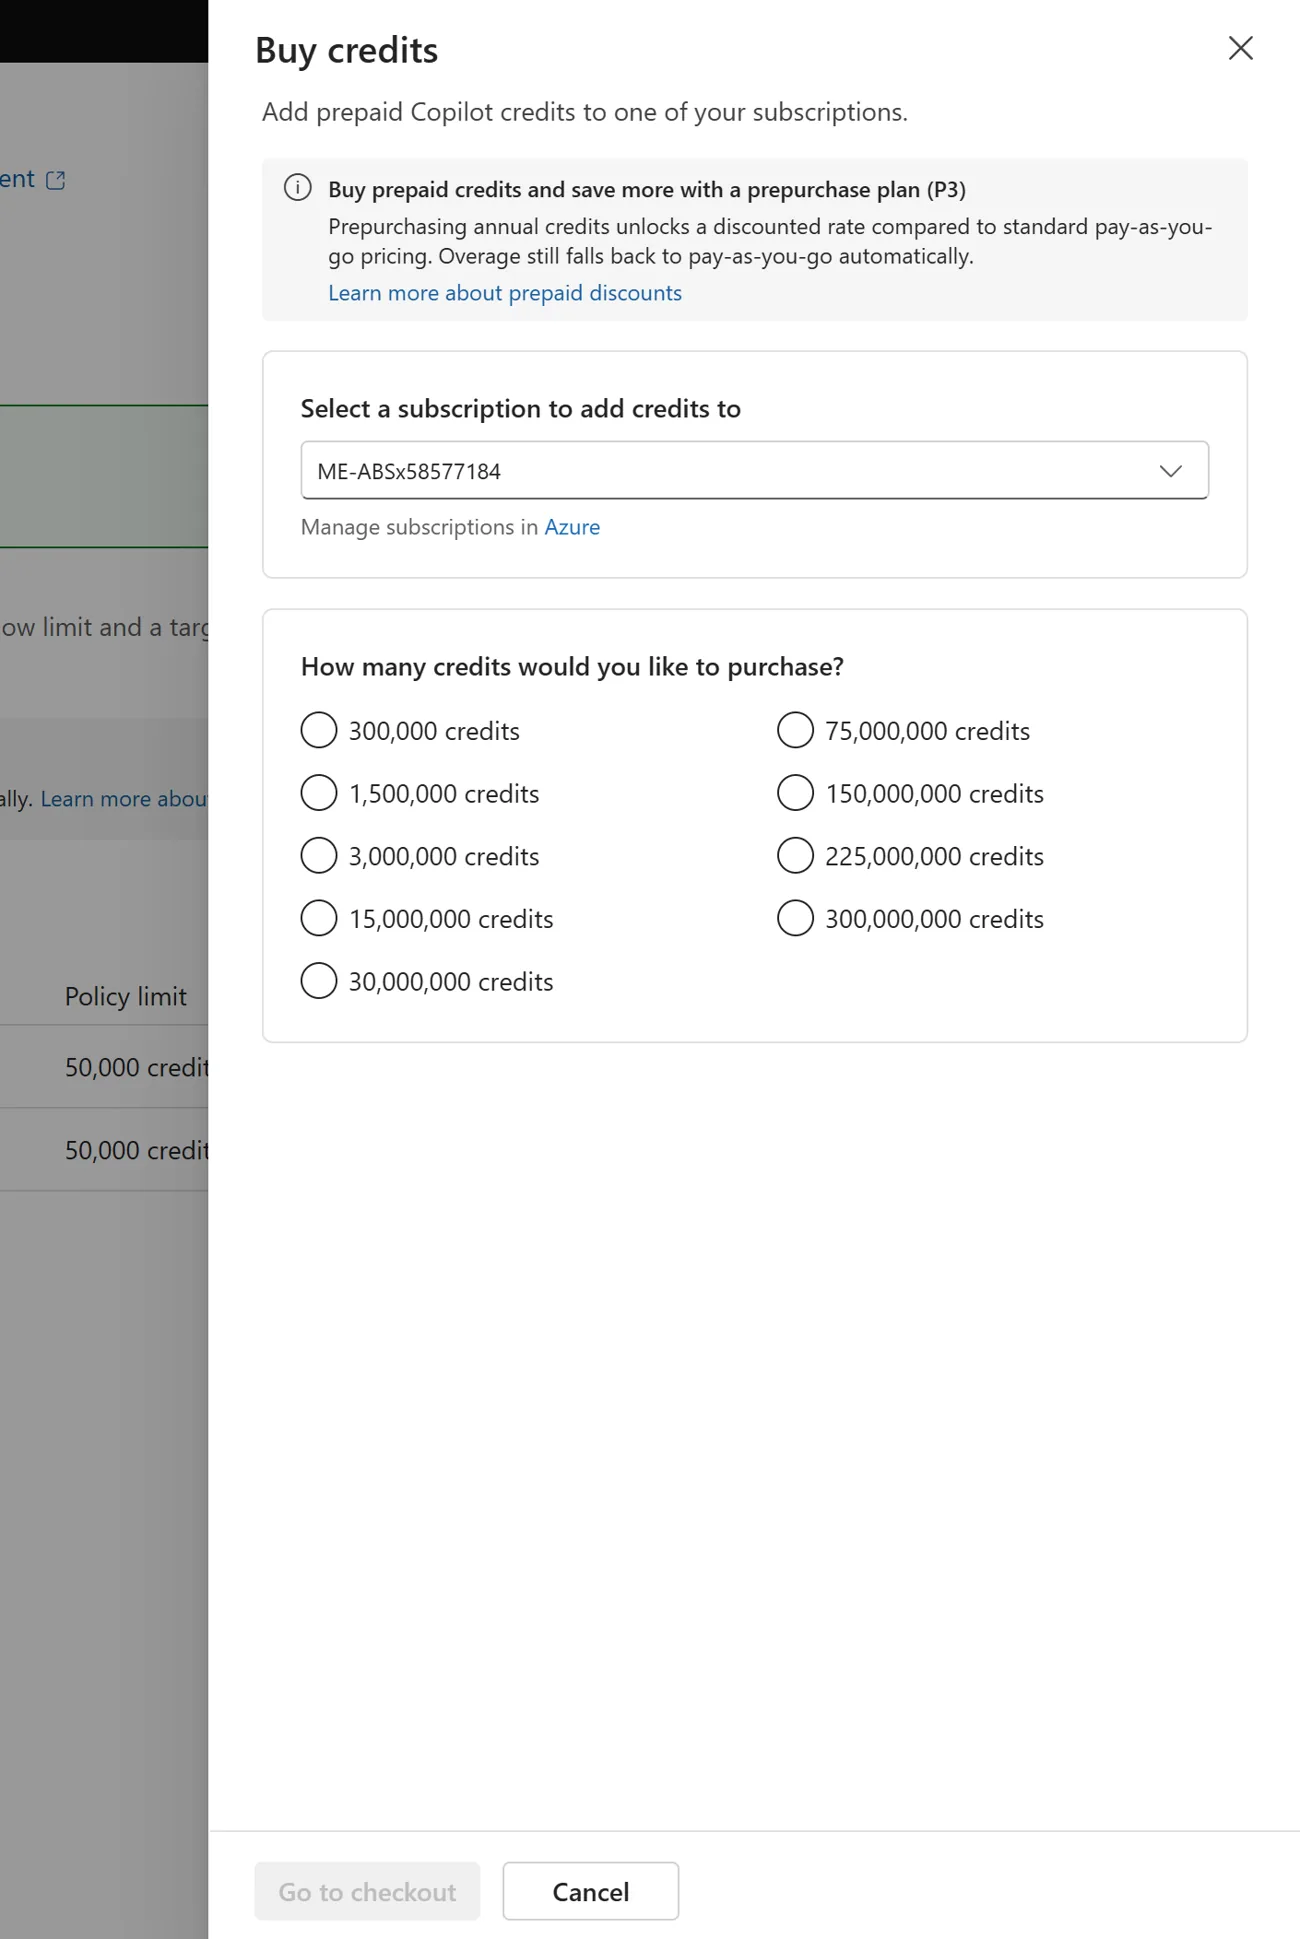
Step 4 — the Buy credits panel: it literally reads “prepurchase plan (P3)”. Pick a subscription and a credit volume; overage falls back to pay-as-you-go.
Step 5 — watch the spend
- The Overview tab is your snapshot: total credits used, the prepaid vs pay-as-you-go split, active users, top actions (credit requests, who’s near a limit), and the consumption trend.
- The Consumption tab is the drill-down — usage by user, group, or agent/service over time, with each user’s limit, recent activity, and session count. These are your FinOps views for finding the cost drivers.
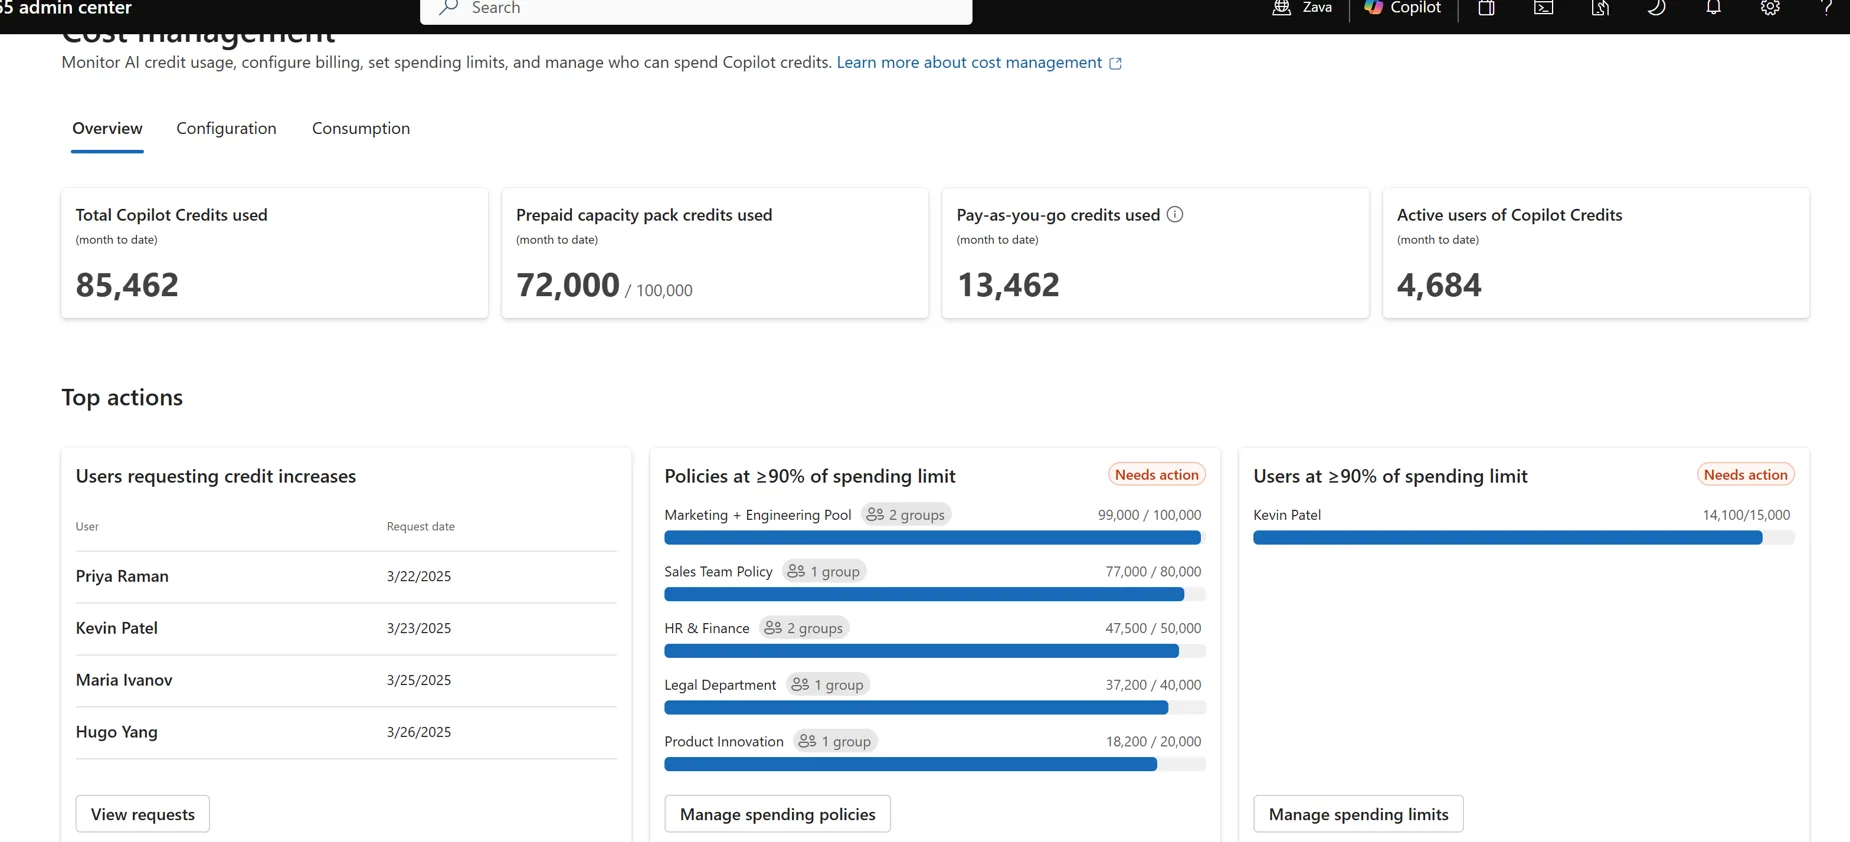
The Overview tab — total credits used, the prepaid-vs-pay-as-you-go split, active users, and a Top actions row flagging credit requests and anyone near a limit.
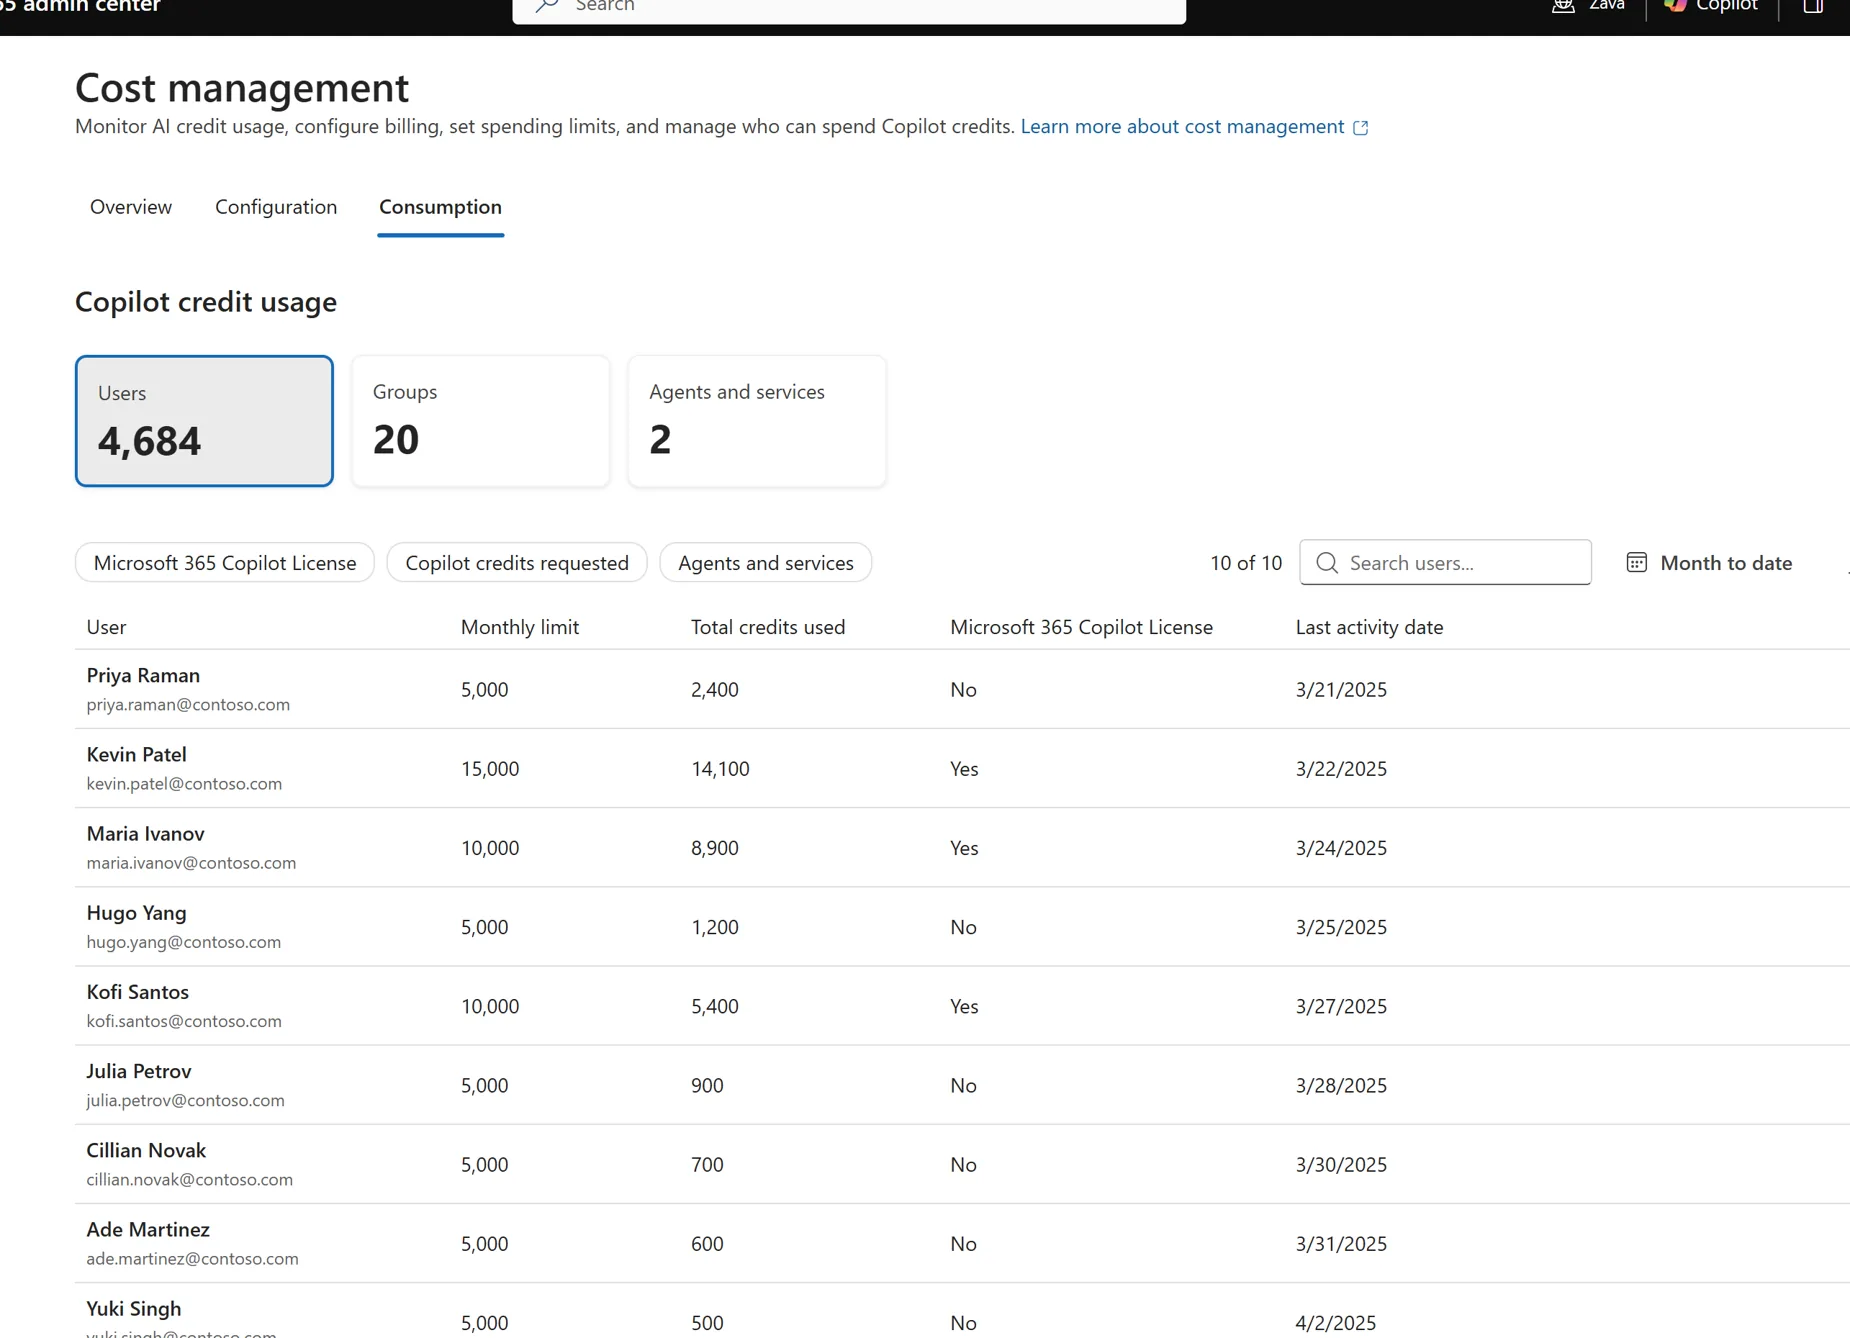
The Consumption tab — drill into usage by user (shown), group, or service, with each user’s limit, spend, licence status, and last activity. (Demo data.)
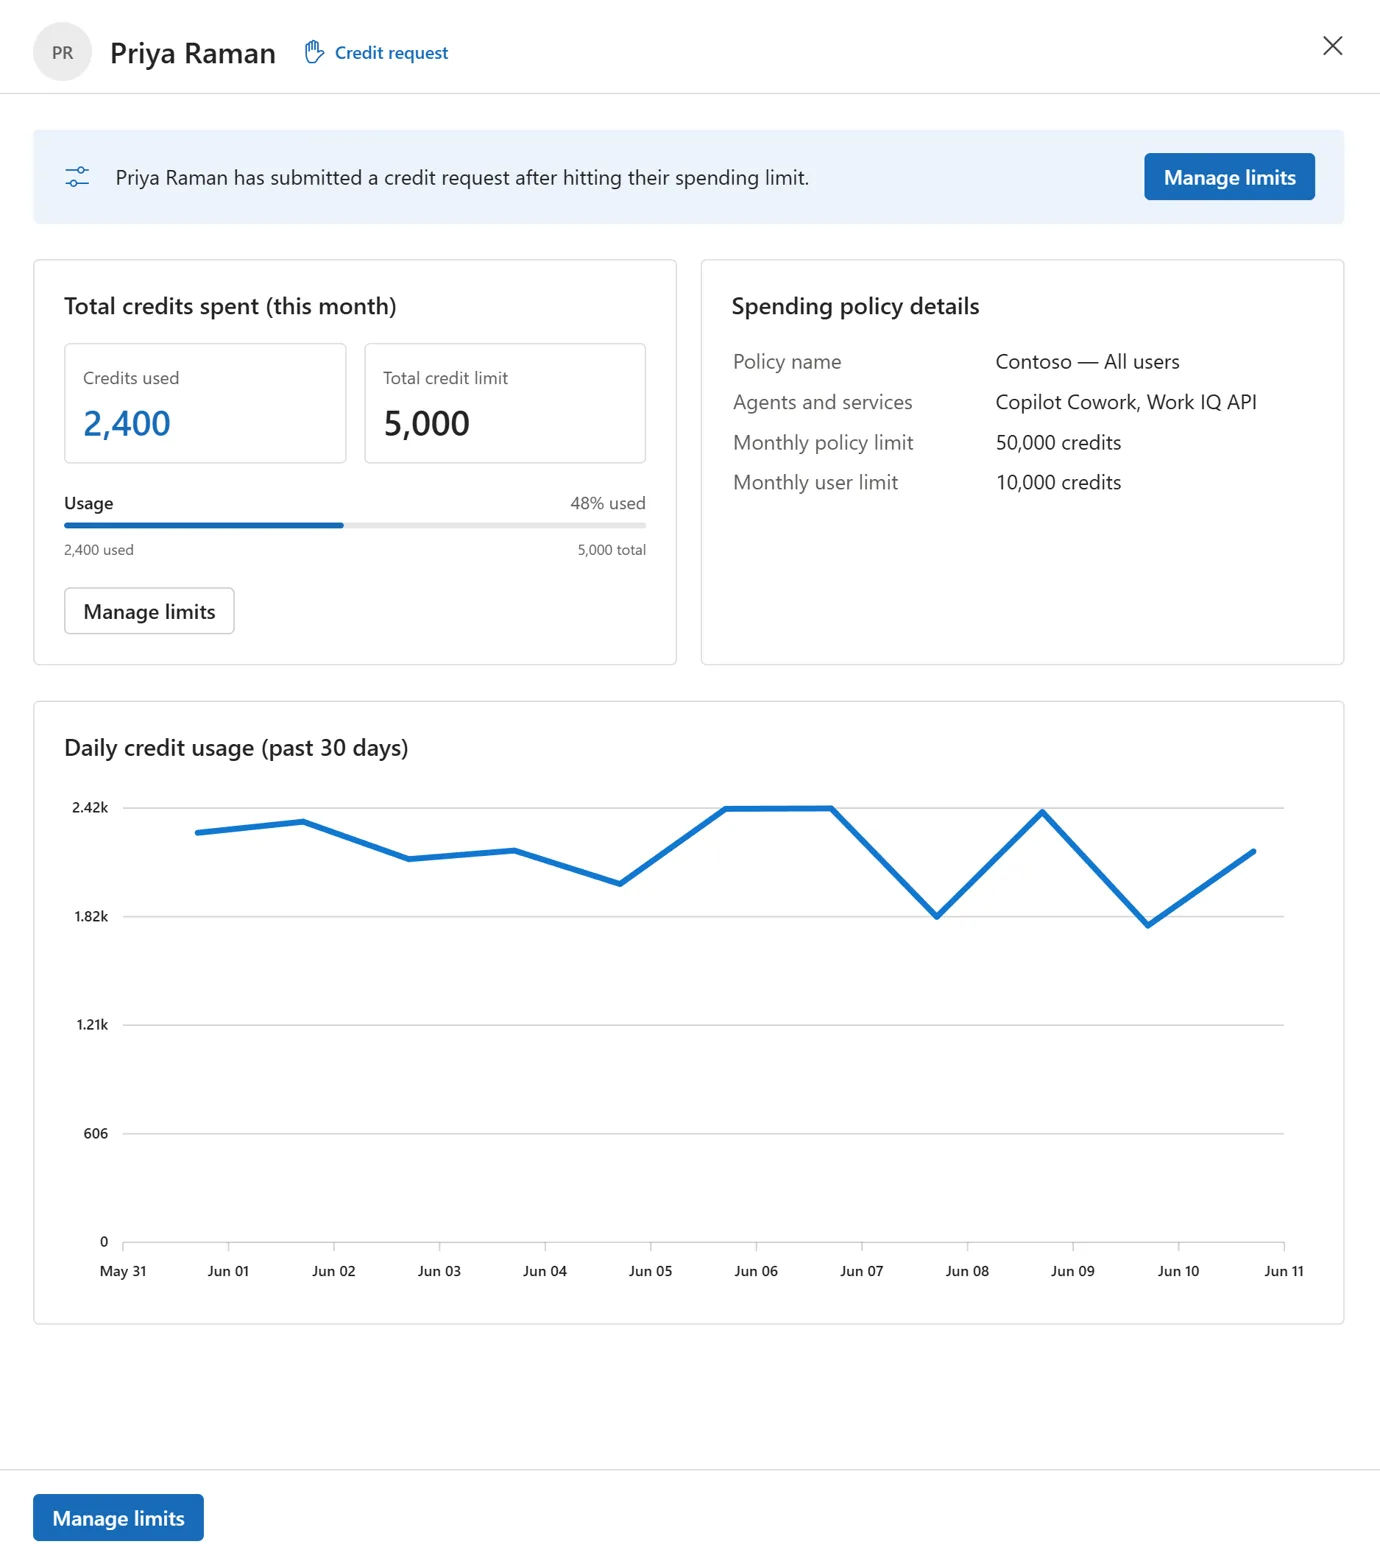
Drill into any user — here Priya Raman, who hit her limit and requested more: 2,400 of 5,000 credits used, her policy details, and a 30-day usage trend. This is the FinOps view for spotting heavy users.
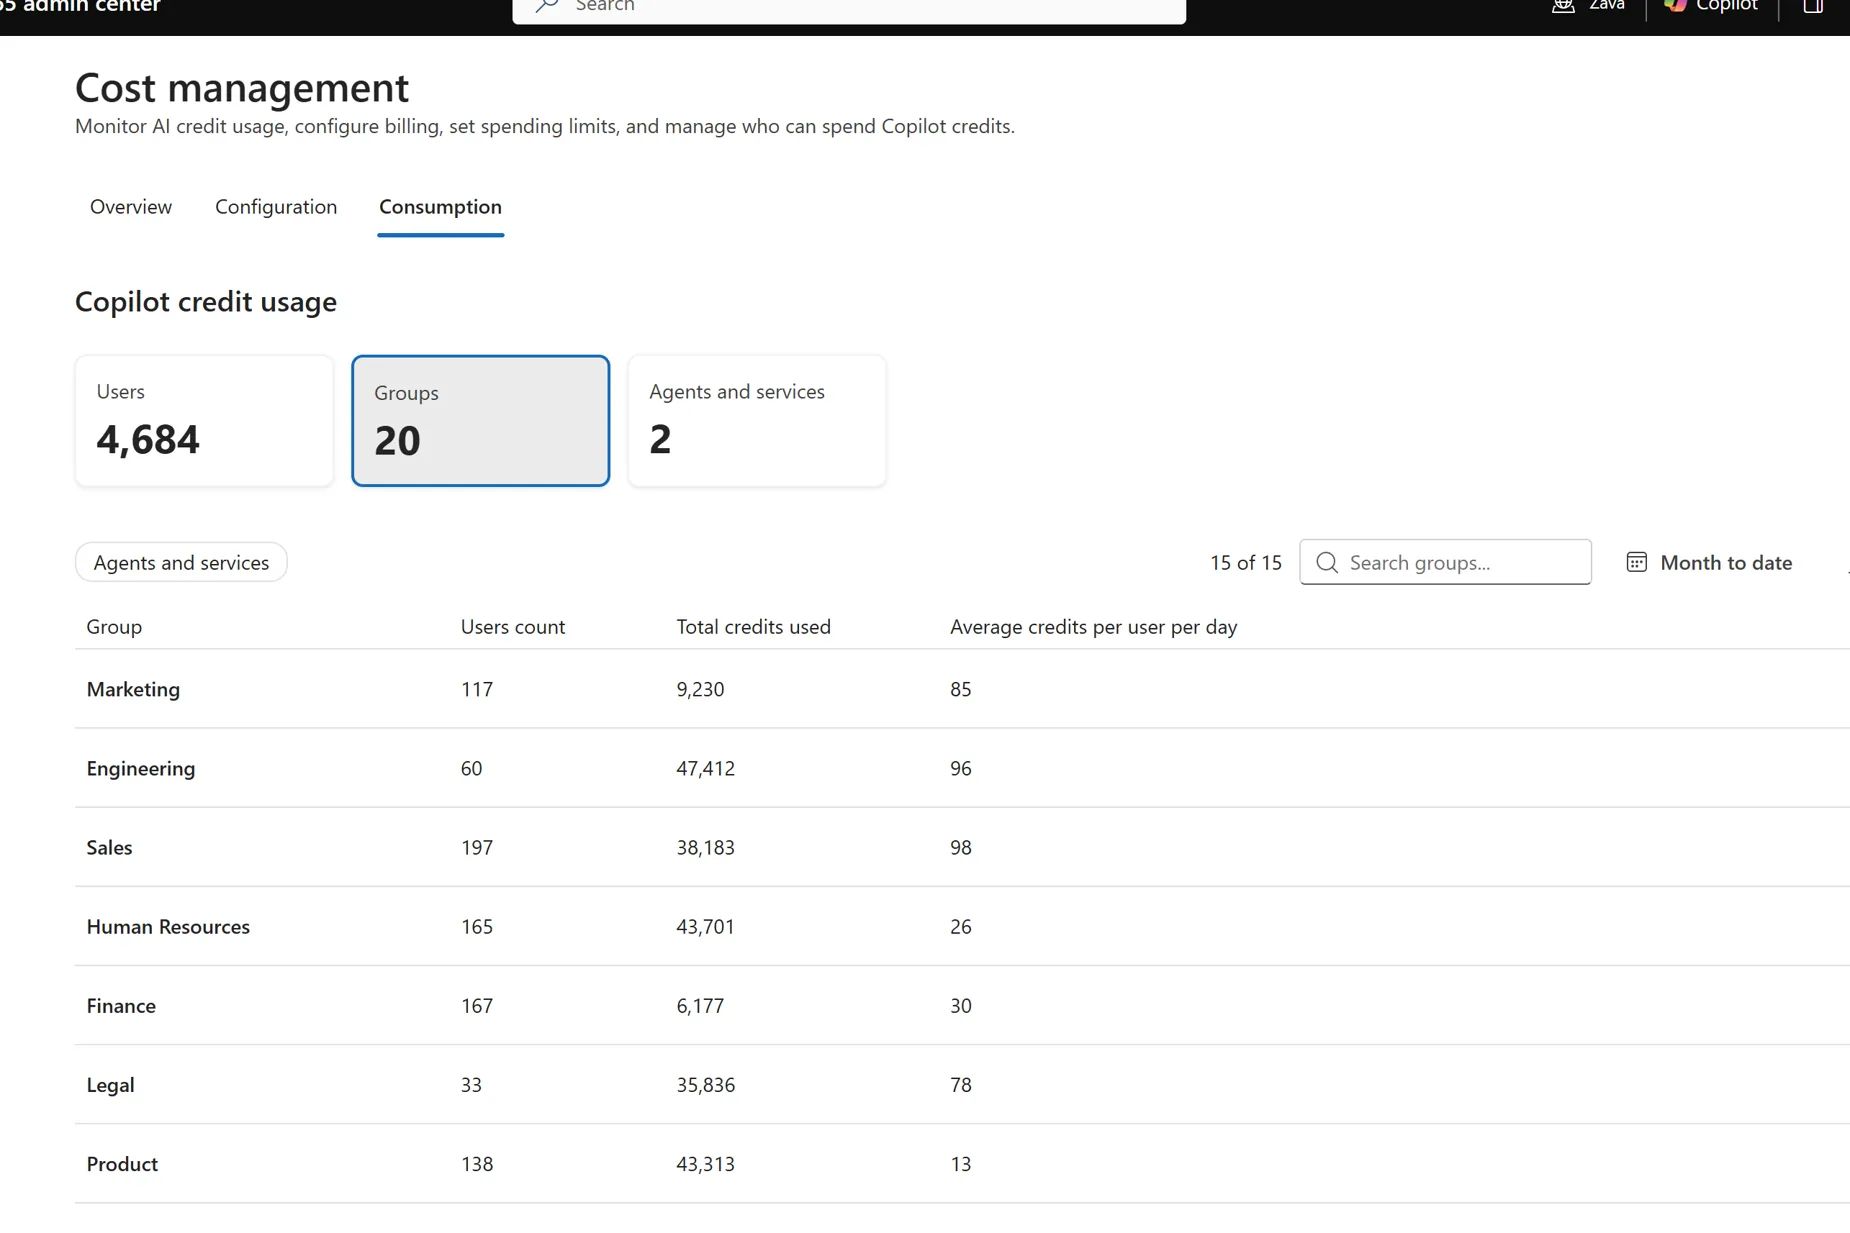
The same Consumption tab pivoted to Groups — total spend and average per-user-per-day for each team, so you can see which groups drive the cost. You can export this view for finance.
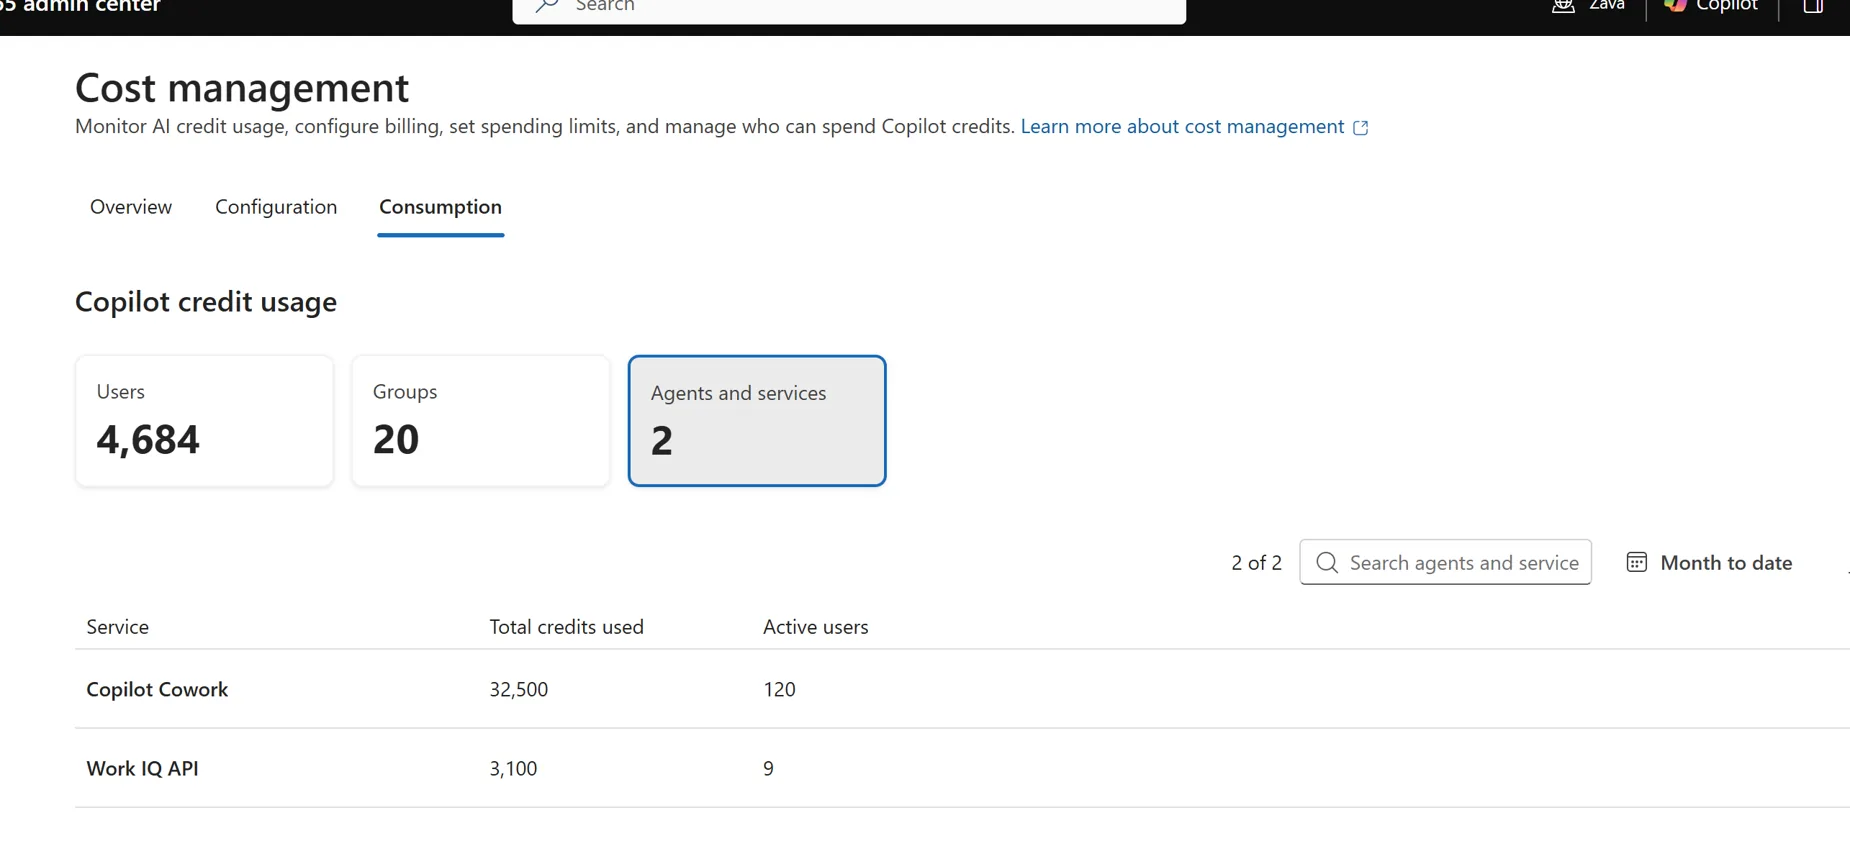
And pivoted to Agents and services — which metered service is actually burning the credits. Today that’s Copilot Cowork and the Work IQ API.
What happens when you hit a limit
When you set a spending limit, it’s a hard cap, not a soft warning — and you can also choose not to cap a policy at all (Microsoft Learn):
- When a user, group, or the tenant reaches the limit, access to the metered services stops for the rest of the month.
- Access resumes when credits reset on the first of the next month.
- A user who’s blocked can request access or more credits from inside the experience. The request lands in the admin’s credit-requests queue (surfaced under Top Actions → View requests), where you can add them to a policy, raise a limit, or onboard a whole group.
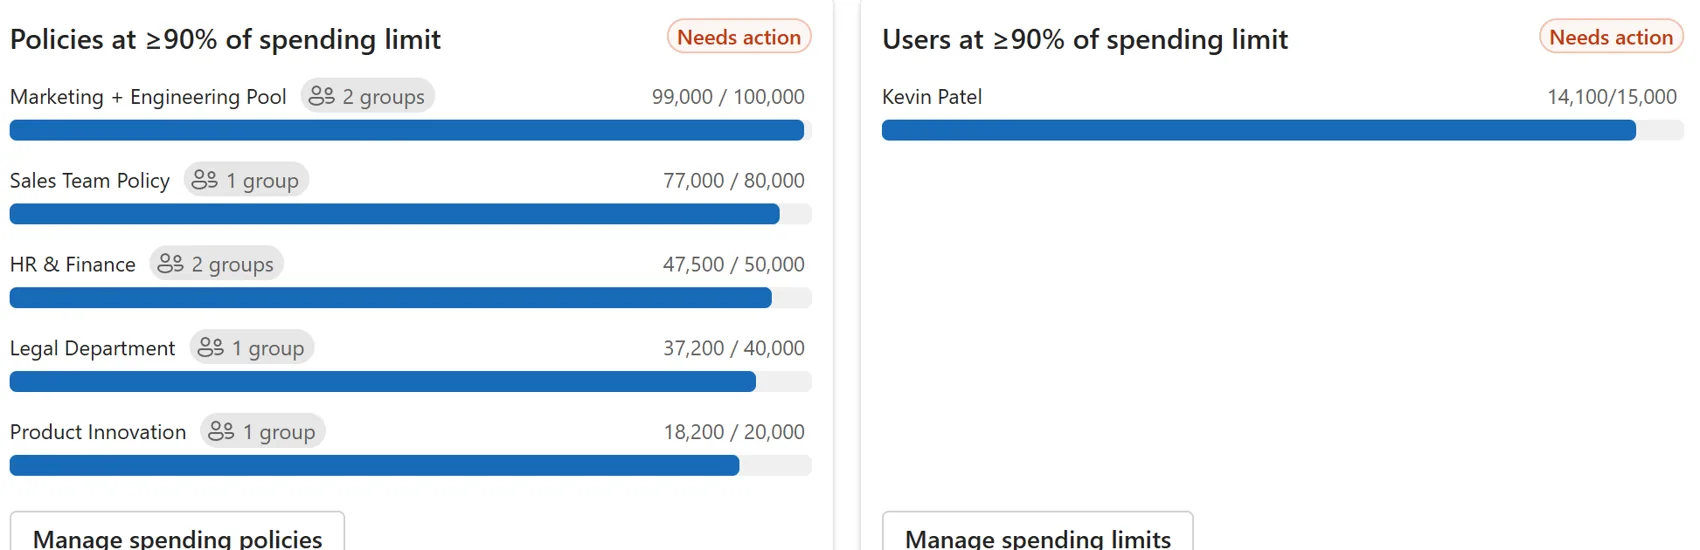
The dashboard flags policies and users at ≥90% of their limit so you can act before service stops — raise the limit, or let the credit-request flow handle it.
That request-and-approve loop is the pressure valve — set caps low to stay safe, and let genuine demand surface through requests rather than guesswork.
Where the charges show up — and who owns the bill
A useful mental model: the Microsoft 365 admin center is the control surface, and Azure is the financial surface.
- Pay-as-you-go runs through an Azure subscription, so the spend lands on that subscription’s invoice and shows up in Azure billing / Cost Management.
- The P3 Pre-Purchase Plan is bought as an Azure reservation and is billed as a separate line item — importantly, it is not deducted from your Azure Prepayment (formerly “monetary commitment”) balance (Microsoft Learn — Azure).
- Prepaid capacity packs are purchased through the Microsoft 365 admin center as a monthly subscription.
Because the money lives in Azure but the controls live in the Microsoft 365 admin center, the people who should be watching are usually a small group: the Billing admin or Azure subscription owner for the invoice, and the AI/License admin for the spending policies and the consumption dashboard. Agree who owns which before you switch it on.
Who can do what — admin roles & prerequisites
Roles matter here, because setting a billing method and creating a spending policy are deliberately split (Microsoft Learn).
| Task | Roles that can do it |
|---|---|
| Set / change the billing method | Global admin · Billing admin |
| Create spending policies, set limits & alerts, view the dashboard | AI admin · License admin (plus Global / Billing) |
| Turn on the discovery setting (Copilot → Settings) | Global admin · AI admin |
| Buy the P3 pre-purchase (Azure reservation) | Azure subscription Owner or Reservation Purchaser |
A few prerequisites worth checking first:
- Pay-as-you-go needs an Azure subscription to carry the spend. If you don’t have one, a Global admin can have the system create one during setup.
- P3 via Enterprise Agreement needs the Reserved Instances policy enabled; CSP customers follow the partner reservation flow.
- Least privilege: Global Administrator is highly privileged — use the AI or Billing admin roles for day-to-day cost management instead.
Procurement caveats — MACC, currency & agreements
The bits enterprise buyers always ask about, with honest “confirm this” flags where the public docs stop short:
- Azure Prepayment / monetary commitment: the P3 pre-purchase is a separate invoice line item and is not drawn from your Azure Prepayment balance (per Microsoft’s Azure docs).
- MACC (Azure consumption commitment): whether the P3 plan counts toward a MACC isn’t something Microsoft states in its public docs — confirm with your Microsoft licensing contact before you bank on it.
- Currency, region & tax: the $0.01/credit and $200/25,000 figures are US list, indicative only. Local currency, taxes, regional availability, and your agreement can all change the number — use Microsoft’s billing portal or price sheet for the figure you’ll actually pay.
- Adjacent costs bill separately: anything an agent calls — premium connectors, Dataverse, Power Automate, Azure resources — has its own charges, distinct from Copilot Credits.
Common mistakes to avoid
The traps that turn up most often:
- Turning on discovery before policies and caps are ready — you expose the experience before you can control the spend.
- Treating “P3” as a product-tier ladder — there’s no P1 or P2; P3 is just the pre-purchase plan’s name.
- Sizing prepaid packs to peak, not baseline — unused monthly credits don’t roll over, so you pay for headroom you lose.
- Assuming P3 draws from your Azure Prepayment or MACC — it’s a separate line item; confirm the commitment treatment with licensing.
- Forgetting the adjacent charges — connectors, Dataverse, Power Automate, and Azure resources an agent calls bill separately.
- Leaving “auto-include new services” on without review — scope can quietly expand as Microsoft adds metered services.
What each audience should take away
- Admins: configure policies and caps before you flip on discovery; start with Specific groups; watch the requests queue and near-limit users.
- Finance / FinOps: choose pay-as-you-go vs prepaid on your observed monthly floor, not aspiration; confirm the invoice owner, MACC treatment, currency and tax before committing.
- Sellers / partners: lead with “seats unlock, credits meter”; explain P3 as annual pre-purchase, not a missing P1/P2 ladder.
The safe rollout pattern
The sane sequence, every time:
- Caps before users. Set the budget guardrails — tenant cap, per-user cap, alerts — before anyone starts.
- Pilot with a Specific-groups policy. Start with 10–20 people, a tight cap, and Cowork/Work IQ scoped in.
- Watch the Overview + Consumption tabs for a couple of weeks. Find the heavy users and the cost drivers.
- Expand deliberately, raising limits or adding groups as real demand shows up through credit requests.
- Estimate first. Model your expected burn with the Cowork Cost Calculator before you set a cap.
✅ A safe default to copy: discovery off · pay-as-you-go connected · a Specific-groups pilot policy · a monthly group cap + per-user cap · alerts at 80–90% · review weekly for the first month.
📎 Seeing Copilot Cowork “disappear” for users after GA? That’s usually the discovery setting + spending-policy gating, not a bug — the fix is in the Cowork admin & governance guide.
Send the customer this
A paste-able summary for a customer or stakeholder:
Microsoft 365 Copilot now bills in two layers: a per-user seat that unlocks the experience, and Copilot Credits that meter the agent work (Cowork, Work IQ API). You control credits in the Microsoft 365 admin center with spending policies — caps, alerts, and per-group or per-user limits — and you pay pay-as-you-go ($0.01/credit), via monthly prepaid packs, or with an annual P3 pre-purchase for a volume discount. There’s no P1 or P2 — “P3” is just the plan’s name. Start with a capped pilot, watch the dashboard, then expand.
A quick glossary
| Term | Plain meaning |
|---|---|
| Copilot seat | The per-user Microsoft 365 Copilot licence — the entry point that unlocks the experiences. |
| Copilot Credit | The usage meter. Pay-as-you-go it’s $0.01; different actions cost different amounts. |
| Spending policy | The rule that sets who can spend, how much, and on which services. |
| Capacity pack | A monthly block of prepaid credits ($200 / 25,000), no rollover. |
| P3 (Pre-Purchase Plan) | An annual prepaid commitment bought as an Azure reservation, discounted by volume. |
| CCCU | Copilot Credit Commit Unit — the unit inside P3; 1 CCCU ≈ $1 of usage (about 100 credits). |
| Discovery setting | The toggle that makes usage-based experiences visible to users. |
| Cost Management dashboard | The Microsoft 365 admin center experience for policies, budgets, and reporting. |
Official Microsoft sources
The public, primary references behind this page:
- Usage-based billing for Copilot Credits — overview
- Managing AI experiences enabled by usage-based billing — spending policies, billing order, roles, monitoring
- Discovery setting for AI experiences
- Optimize Copilot Credit costs with a pre-purchase plan (P3) — CCCUs, tiers, Azure reservation
- Copilot Studio billing & licensing — the messages → credits change, capacity packs
- Power Automate licensing — P1/P2 legacy plans
Where to go next
- Proving Copilot ROI — The Field Guide — the other half of the cost conversation: turn spend into a defensible ROI story (with the ROI Calculator)
- What Are Copilot Credits? Rates & Costs — the meter and the full per-action rate card
- Copilot Messages vs Copilot Credits — What Changed? — migrating from the old “messages” model
- Cowork: Pricing & cost management — what a Cowork task actually costs
- Cowork: Admin enablement & governance — turning Cowork on and locking it down
- Cowork Cost Calculator — model your expected monthly credit spend
- Microsoft Copilot Pricing & Tiers Explained — the hub: every Copilot plan on one page
- Copilot & GitHub Pre-Purchase Plans (P3) Explained — the four “P3” plans, and whether GitHub credits can pay for Cowork